Introduction
In This article, we learn about the BMP180 Sensor we will try to explain the BMP180 sensor on my side and I will also interface the BMP180 with Arduino microcontroller. The BMP180 Sensor measures pressure, temperature & altitude. and is popular they used digital barometric pressure and temperature sensors.
we will be interfacing the sensor with the Arduino controller and the pressure temperature and altitude will be displayed in the 16×2 LCD and serial monitor. and in future, we will make various projects like weather monitoring, altitude measurement, and navigation systems.
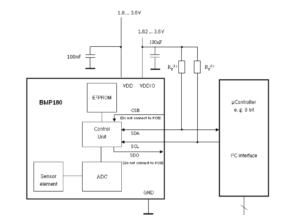
This image shows how the sensor interface will take images in BMP180 DataSheet.
Components Needed
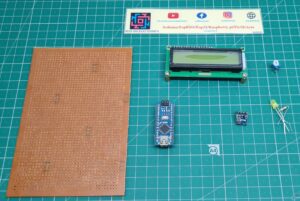
- Arduino Nano
- BMP-180
- Display
- 10k POT
- Zero PCB
Working Principle for BMP-180
- The BMP180 is a piezo-resistive sensor analog to digital converter that controls unit E2PROM and is interfacing with the (Inter-Integrated Circuit) I2C protocol.
- The BMP180 Delivers the uncompensated value of pressure temperature and altitude.
- The BMP180 sensor measures atmospheric pressure within a range of 300 to 1100 hPa.
- When you connect to the Arduino, you can use the Adafruit BMP085 or Adafruit BMP180 library.
- BMP180 sensors are in Pascals (Pa). the convert the values to hectopascals (hPa) or millibars (mb) for easier interpretation.
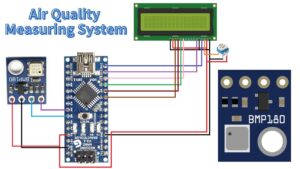
Now we connected to the BMP180 Sensor with Arduino.
- Vin – +5v
- GND – GND
- SDA – A4
- SCL – A5
Features And Specifications
- Supply Voltage: 2.8v to 4.5v
- Power Consumption: 0.5uA At 1Hz
- Speed: 3.5MHz
- Very Low Noise: 0.02hPa(17cm)
- Pressure Range: 300hPa To 1100hPa
- Interfacing Medium: I2C
Application In Real Time
- Weather Monitoring
- Altitude Measurement
- Navigation Systems
- Air Pressure
Circuit Diagram
Connect the BMP180 Sensor to Arduino
- Now we connecting the BMP180 sensor module to the Arduino board.
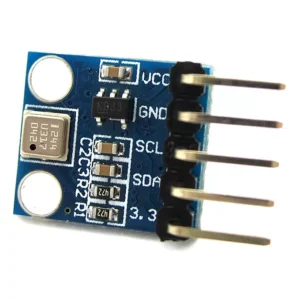
- The BMP180 module typically has four pins: VCC, GND, SDA, and SCL.
- The VCC pin of the BMP180 module is Connected to the 5V pin on the Arduino.
- The GND pin of the BMP180 module is Connected to the GND pin on the Arduino.
- The SDA pin of the BMP180 module is Connected to the SDA pin on the Arduino A4.
- The SCL pin of the BMP180 module is Connected to the SCL pin on the Arduino A5.
Code
Code with Serial Monitor
Before you upload the code install the Librarie Adafruit_BMP085.h
|
1 2 3 4 5 6 7 8 9 10 11 12 13 14 15 16 17 18 19 20 21 22 23 24 25 26 27 28 29 30 31 32 33 34 35 36 37 38 |
#include <Wire.h> #include <Adafruit_BMP085.h> #define seaLevelPressure_hPa 1013.25 Adafruit_BMP085 bmp; void setup() { Serial.begin(9600); if (!bmp.begin()) { Serial.println("BMP085 sensor not work, check wiring!"); while (1) {} } } void loop() { Serial.print("Temperature = "); Serial.print(bmp.readTemperature()); Serial.println(" *C"); Serial.print("Pressure = "); Serial.print(bmp.readPressure()); Serial.println(" Pa"); Serial.print("Altitude = "); Serial.print(bmp.readAltitude()); Serial.println(" meters"); Serial.print("Pressure at sealevel (calculated) = "); Serial.print(bmp.readSealevelPressure()); Serial.println(" Pa"); Serial.print("Real altitude = "); Serial.print(bmp.readAltitude(seaLevelPressure_hPa * 100)); Serial.println(" meters"); Serial.println(); delay(500); } |
Code with 16×2 LCD Display
Before you upload the code install the library Adafruit_BMP085.h
|
1 2 3 4 5 6 7 8 9 10 11 12 13 14 15 16 17 18 19 20 21 22 23 24 25 26 27 28 29 30 31 32 33 34 35 36 37 |
#include <Wire.h> #include <Adafruit_BMP085.h> #include <LiquidCrystal.h> LiquidCrystal lcd(12, 11, 10, 9, 8, 7); Adafruit_BMP085 bmp; void setup() { lcd.begin(16, 2); lcd.print("BMP Interfacing"); lcd.setCursor(0, 1); lcd.print("with Arduino"); delay(2000); lcd.clear(); if (!bmp.begin()) { lcd.print("BMP not found!"); while (1) ; } } void loop() { float temperature = bmp.readTemperature(); float pressure = bmp.readPressure() / 100.0; lcd.setCursor(0, 0); lcd.print("Temp: "); lcd.print(temperature); lcd.print(" C"); lcd.setCursor(0, 1); lcd.print("Pressure: "); lcd.print(pressure); lcd.print(" hPa"); delay(1000); } |
Code With 20×4 LCD Display
|
1 2 3 4 5 6 7 8 9 10 11 12 13 14 15 16 17 18 19 20 21 22 23 24 25 26 27 28 29 30 31 32 33 34 35 36 37 38 39 40 41 42 43 44 45 46 47 48 49 50 51 52 53 54 55 56 57 58 59 60 61 62 63 64 65 66 67 68 69 70 71 72 73 74 75 76 77 78 79 80 81 82 83 84 85 86 87 88 89 90 91 92 93 94 95 96 97 98 99 100 101 102 103 104 105 |
#include <LiquidCrystal.h> LiquidCrystal lcd(12, 11, 10, 9, 8, 7); #include "SFE_BMP180.h" #include <Wire.h> SFE_BMP180 pressure; #define ALTITUDE 1655.0 void setup() { Serial.begin(9600); Serial.println("BMP180 Measurements"); lcd.begin(20, 4); lcd.setCursor(0, 0); lcd.print("BMP180 Measurements"); lcd.setCursor(0, 1); lcd.print(" 1. Altitude"); lcd.setCursor(0, 2); lcd.print(" 2. Temperature"); lcd.setCursor(0, 3); lcd.print(" 3. Pressure"); delay(3000); lcd.clear(); if (pressure.begin()) Serial.println("BMP180 init success"); else { Serial.println("BMP180 init fail\n\n"); while (1) ; } } void loop() { char status; double T, P, p0, a; Serial.println(); Serial.print("provided altitude: "); lcd.setCursor(0, 0); lcd.print("Altitude: "); Serial.print(ALTITUDE, 0); Serial.print(" meters, "); Serial.print(ALTITUDE * 3.28084, 0); lcd.print(ALTITUDE * 3.28084, 0); Serial.println(" feet"); lcd.print(" ft"); status = pressure.startTemperature(); if (status != 0) { delay(status); status = pressure.getTemperature(T); if (status != 0) { Serial.print("temperature: "); Serial.print(T, 2); Serial.print(" deg C, "); Serial.print((9.0 / 5.0) * T + 32.0, 2); Serial.println(" deg F"); lcd.setCursor(0, 1); lcd.print("Temperature: "); lcd.print(T, 2); lcd.print(" C "); status = pressure.startPressure(3); if (status != 0) { delay(status); status = pressure.getPressure(P, T); if (status != 0) { Serial.print("absolute pressure: "); Serial.print(P, 2); Serial.print(" mb, "); Serial.print(P * 0.0295333727, 2); Serial.println(" inHg"); lcd.setCursor(0, 2); lcd.print("Abs. Pr.: "); lcd.print(P, 2); lcd.print(" mb "); p0 = pressure.sealevel(P, ALTITUDE); Serial.print("relative (sea-level) pressure: "); Serial.print(p0, 2); Serial.print(" mb, "); Serial.print(p0 * 0.0295333727, 2); Serial.println(" inHg"); lcd.setCursor(0, 3); lcd.print("Rel. Pr.: "); lcd.print(p0, 2); lcd.print(" mb"); a = pressure.altitude(P, p0); Serial.print("computed altitude: "); Serial.print(a, 0); Serial.print(" meters, "); Serial.print(a * 3.28084, 0); Serial.println(" feet"); } else Serial.println("error retrieving pressure measurement\n"); } else Serial.println("error starting pressure measurement\n"); } else Serial.println("error retrieving temperature measurement\n"); } else Serial.println("error starting temperature measurement\n"); delay(2000); } |
Code With OLED Display
Before you upload the code just install the library Adafruit_BMP085.h And Adafruit_SSD1306.h
|
1 2 3 4 5 6 7 8 9 10 11 12 13 14 15 16 17 18 19 20 21 22 23 24 25 26 27 28 29 30 31 32 33 34 35 36 37 38 39 40 41 42 43 44 45 46 47 48 49 50 51 52 53 54 55 56 57 58 59 60 61 62 |
#include <Wire.h> #include <Adafruit_BMP085.h> #include <Adafruit_GFX.h> #include <Adafruit_SSD1306.h> #define seaLevelPressure_hPa 1013.25 Adafruit_BMP085 bmp; Adafruit_SSD1306 display = Adafruit_SSD1306(128, 64, &Wire, -1); void setup() { Serial.begin(115200); if (!bmp.begin()) { Serial.println("BMP085 sensor not work, check wiring!"); while (1) {} } display.begin(SSD1306_SWITCHCAPVCC, 0x3C); if (!display.begin(SSD1306_SWITCHCAPVCC, 0x3C)) { Serial.println(F("SSD1306 allocation failed")); for (;;) ; } delay(2000); display.clearDisplay(); display.setTextColor(WHITE); } void loop() { Serial.print("Temperature = "); Serial.print(bmp.readTemperature()); Serial.println(" *C"); Serial.print("Pressure = "); Serial.print(bmp.readPressure()); Serial.println(" Pa"); Serial.println(); display.setTextSize(1); display.setCursor(0, 0); display.print("Temperature: "); display.setTextSize(2); display.setCursor(0, 10); display.print(bmp.readTemperature()); display.print(" "); display.setTextSize(1); display.cp437(true); display.write(167); display.setTextSize(2); display.print("C"); display.setTextSize(1); display.setCursor(0, 35); display.print("Pressure: "); display.setTextSize(2); display.setCursor(0, 45); display.print(bmp.readPressure()); display.print(" Pa"); display.display(); delay(1000); display.clearDisplay(); } |
Video
Conclusion
In This article we interface the BMP180 Sensor with Arduino and the value will display in serial monitor,16×2 LCD and OLED display. the sensor is working perfectly but the sensor reading speed will slow and is very easy to interface because of the I2C.
More Projects
