Motion Detection Using Ultrasonic Sensor
Introduction
In this article, we will explore how to create a motion detection system using an Arduino Nano, an ultrasonic sensor, and a 16×2 LCD display. This system can be used for various applications, including security systems, automation, and energy-saving solutions. By detecting motion and displaying relevant information on the LCD display, we can enhance monitoring and control in different environments.
Components Needed
- Arduino Nano
- Ultrasonic Sensor (HC-SR04)
- 16×2 LCD Display
- Soldering wires
- USB cable (for programming the Arduino)
- Computer with Arduino IDE installed
Ultrasonic Sensor (HC-SR04)
The HC-SR04 Ultrasonic Sensor is a commonly used sensor module for measuring distance using ultrasound. It is inexpensive, easy to use, and provides accurate distance measurements. Here’s an explanation of the HC-SR04 Ultrasonic Sensor
Working Principle
The HC-SR04 sensor works based on the echo time measurement of ultrasound waves. It emits ultrasonic sound waves from the transmitter and waits for them to bounce back after hitting an object. By measuring the time taken for the echo to return, the distance between the sensor and the object can be calculated.
Key Components
- Transmitter: Emits ultrasonic sound waves in the range of 40 kHz.
- Receiver: Detects the echo signal reflected by the object.
- Trigger Pin: Sends a short high-level pulse to start the measurement.
- Echo Pin: Receives the echo signal and measures the time taken.
The measurement process involves the following steps
- The trigger pin is set to high for a short duration (typically 10 microseconds) to initiate the measurement.
- The transmitter emits a burst of ultrasonic waves.
- The receiver waits for the echo signal to return.
- When the echo is received, the echo pin goes high, and the time is recorded.
- The time taken for the echo to return is directly proportional to the distance between the sensor and the object.
- Using the speed of sound in air (approximately 343 meters per second), the distance can be calculated.
Arduino Nano
- The Arduino Nano is powered by the ATmega328P microcontroller chip, which is the same microcontroller used in the Arduino Uno board. The ATmega328P operates at a clock speed of 16 MHz and has 32KB of flash memory, 2KB of SRAM, and 1KB of EEPROM.

- The Nano is significantly smaller compared to other Arduino boards, measuring approximately 45mm x 18mm. It is designed in a compact DIP (Dual Inline Package) format, making it suitable for projects with space constraints or when a smaller form factor is required.
- The Arduino Nano provides a total of 14 digital I/O pins, of which 6 can be used for PWM (Pulse Width Modulation) output. It also offers 8 analog input pins, each of which can provide a 10-bit resolution. These pins allow you to interface with various sensors, actuators, and other electronic components.
16×2 LCD Display
- The 16×2 LCD display is rectangular in shape and typically measures around 80mm x 36mm. It usually consists of a backlit LCD screen, control circuitry, and a connection interface.

- The display has two rows, with each row capable of displaying up to 16 characters. The characters can be letters (both uppercase and lowercase), numbers, punctuation marks, symbols, and special characters.
- Many 16×2 LCD displays feature a built-in backlight, usually in the form of white or blue LEDs, to improve visibility in low-light conditions. The backlight can be controlled separately from the characters, allowing you to turn it on or off as needed.
- The LCD display module often includes an integrated controller, such as the commonly used HD44780 controller. The controller simplifies the interface with external devices by handling the low-level operations of displaying characters, managing the cursor position, and interpreting commands.
- The 16×2 LCD display can typically store and display custom-defined characters. These characters are created by defining a specific pattern of pixels and can be used to display icons, logos, or other specialized symbols beyond the standard character set.
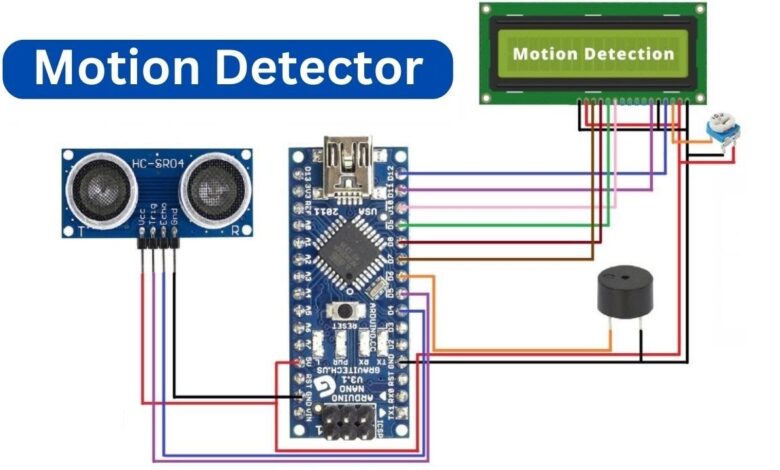
Circuit Diagram
Hardware Connections
- Connect the VCC pin of the ultrasonic sensor to the 5V pin on the Arduino Nano.
- Connect the GND pin of the ultrasonic sensor to the GND pin on the Arduino Nano.
- Connect the Trig pin of the ultrasonic sensor to any digital pin on the Arduino Nano (e.g., D2).
- Connect the Echo pin of the ultrasonic sensor to any digital pin on the Arduino Nano (e.g., D3).
- Connect the VCC pin of the LCD display to the 5V pin on the Arduino Nano.
- Connect the GND pin of the LCD display to the GND pin on the Arduino Nano.
- Connect the SDA pin of the LCD display to the A4 pin on the Arduino Nano.
- Connect the SCL pin of the LCD display to the A5 pin on the Arduino Nano.
Source Code
Install Required Libraries To interface the LCD display and the ultrasonic sensor with the Arduino Nano, you need to install the necessary libraries. Follow these steps:
- Launch the Arduino IDE.
- Go to “Sketch” > “Include Library” > “Manage Libraries”.
- In the Library Manager, search for “LiquidCrystal” and “NewPing”.
- Click on the “LiquidCrystal” library and click the “Install” button.
- Click on the “NewPing” library by “Tim Eckel” and click the “Install” button.
Upload the Code Use the following code as a starting point to detect motion using the ultrasonic sensor and display information on the LCD display.
|
1 2 3 4 5 6 7 8 9 10 11 12 13 14 15 16 17 18 19 20 21 22 23 24 25 26 27 28 29 |
#include <Wire.h> #include <LiquidCrystal.h> #include <NewPing.h> LiquidCrystal lcd(12, 11, 10, 9, 8, 7); NewPing sonar(2, 3, 200); void setup() { lcd.begin(16, 2); lcd.print("Motion Detection"); lcd.setCursor(0, 1); lcd.print("System"); delay(2000); lcd.clear(); } void loop() { unsigned int distance = sonar.ping_cm(); if (distance > 10) { lcd.setCursor(0, 0); lcd.print("Distance: "); lcd.print(distance); lcd.print(" cm"); lcd.setCursor(0, 1); lcd.print("Motion Detect"); } delay(500); } |
Video
Arduino Tutorial


