Introduction
Gas leaks can pose significant risks in various environments, from homes to industrial facilities. To ensure safety and prevent accidents, it’s crucial to detect gas leaks promptly. In this article, we will guide you through the process of building a gas leakage detector using an Arduino Nano, an MQ135 gas sensor, an I2C 16×2 LCD display, red and green LEDs, and a SIM800 GSM module. This DIY project will help you create a reliable gas detection system with real-time alerts.
Components Needed
- Arduino Nano
- MQ-135 Sensor
- 16×2 LCD Display with I2C
- GSM sim800l Module
- LED
- Buzzer
- Wire
- Zero PCB
- 9V power supply
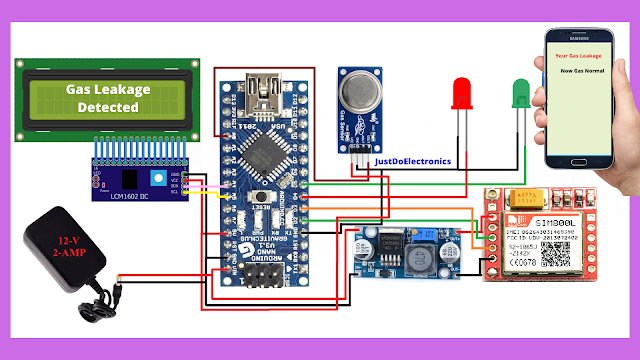
Circuit Diagram
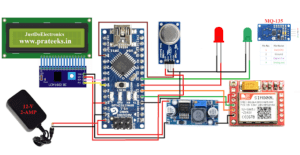
- Connect the VCC pin of the MQ135 sensor to the 5V pin of the Arduino Nano.
- Connect the GND pin of the MQ135 sensor to the GND pin of the Arduino Nano.
- Connect the AOUT pin of the MQ135 sensor to the A0 analog input pin of the Arduino Nano.
- Connect the SDA pin of the LCD display to the A4 pin (SDA) of the Arduino Nano.
- Connect the SCL pin of the LCD display to the A5 pin (SCL) of the Arduino Nano.
- Connect the positive leg of the red LED to pin 4 of the Arduino Nano.
- Connect the positive leg of the green LED to pin 5 of the Arduino Nano.
- Connect the cathode (negative leg) of both LEDs to the GND pin of the Arduino Nano.
- Connect the SIM800 GSM module Tx to 2 and RX to 3 Pin of the Arduino Nano.
Arduino Uno-Based GAS Detector
Source Code
|
1 2 3 4 5 6 7 8 9 10 11 12 13 14 15 16 17 18 19 20 21 22 23 24 25 26 27 28 29 30 31 32 33 34 35 36 37 38 39 40 41 42 43 44 45 46 47 48 49 50 51 52 53 54 55 56 57 58 59 60 61 62 63 64 65 66 67 68 69 70 71 72 73 74 75 76 77 78 79 80 |
//Prateek //https://justdoelectronics.com #include <LiquidCrystal_I2C.h> #include <Wire.h> #include <SoftwareSerial.h> LiquidCrystal_I2C lcd(0x27, 16, 2); SoftwareSerial mySerial(2, 3); int gasValue = A0; int data = 0; int Red = 6; int Green = 7; void setup() { randomSeed(analogRead(0)); mySerial.begin(9600); Serial.begin(9600); lcd.init(); lcd.backlight(); pinMode(gasValue, INPUT); pinMode(Red, OUTPUT); pinMode(Green, OUTPUT); lcd.print(" WELCOME TO"); lcd.setCursor(0, 1); lcd.print("JSUTDOELECTRONIC"); delay(3000); lcd.clear(); lcd.print(" Gas Leakage "); lcd.setCursor(0, 1); lcd.print(" Detector Alarm "); delay(3000); lcd.clear(); } void loop() { data = analogRead(gasValue); Serial.print("Gas Level: "); Serial.println(data); lcd.print("Gas Scan is ON"); lcd.setCursor(0, 1); lcd.print("Gas Level: "); lcd.print(data); delay(1000); if (data > 80) { SendMessage(); Serial.print("Gas detect alarm"); lcd.clear(); lcd.setCursor(0, 0); lcd.print(" Gas Leakage"); lcd.setCursor(0, 1); lcd.print(" SMS Sent"); delay(1000); digitalWrite(Red, HIGH); digitalWrite(Green, LOW); } else { Serial.print("Gas Level Low"); lcd.clear(); lcd.setCursor(0, 0); lcd.print("Gas Level Normal"); digitalWrite(Red, LOW); digitalWrite(Green, HIGH); delay(1000); } lcd.clear(); } void SendMessage() { Serial.println("I am in send"); mySerial.println("AT+CMGF=1"); delay(1000); mySerial.println("AT+CMGS=\"+918830584864xx\"\r"); mySerial.println("Hi Prateek Gas Detected plz Open Windows And Check Your Gas Cylinder"); delay(100); mySerial.println((char)26); delay(1000); } |
Setup() Function
-
- The
randomSeed()the function is used to initialize the random number generator with an analog input value. - Serial communication is initialized with a baud rate of 9600.
- The LCD display is initialized and the backlight is turned on.
- Pin modes for
gasValue,Red, andGreenare set to INPUT and OUTPUT, respectively. - The setup routine displays some welcome messages on the LCD screen for a few seconds.
- The
|
1 2 3 4 5 6 7 8 9 10 11 12 13 14 15 16 17 18 19 20 |
void setup() { randomSeed(analogRead(0)); mySerial.begin(9600); Serial.begin(9600); lcd.init(); lcd.backlight(); pinMode(gasValue, INPUT); pinMode(Red, OUTPUT); pinMode(Green, OUTPUT); lcd.print(" WELCOME TO"); lcd.setCursor(0, 1); lcd.print("JSUTDOELECTRONIC"); delay(3000); lcd.clear(); lcd.print(" Gas Leakage "); lcd.setCursor(0, 1); lcd.print(" Detector Alarm "); delay(3000); lcd.clear(); } |
Loop() Function
-
- Analog reading from the gas sensor is performed using, and the value is stored in the
datavariable. - Gas level information is printed to the Serial monitor and displayed on the LCD.
- If the gas level exceeds a threshold value (80 in this case), the
SendMessage()function is called to send an SMS alert. - The LCD display is updated accordingly and the red LED is turned on while the green LED is turned off.
- If the gas level is below the threshold, the LCD display and LEDs are updated to indicate normal gas levels.
- Analog reading from the gas sensor is performed using, and the value is stored in the
|
1 2 3 4 5 6 7 8 9 10 11 12 13 14 15 16 17 18 19 20 21 22 23 24 25 26 27 28 29 30 31 32 33 34 35 |
void loop() { data = analogRead(gasValue); Serial.print("Gas Level: "); Serial.println(data); lcd.print("Gas Scan is ON"); lcd.setCursor(0, 1); lcd.print("Gas Level: "); lcd.print(data); delay(1000); if (data > 80) { SendMessage(); Serial.print("Gas detect alarm"); lcd.clear(); lcd.setCursor(0, 0); lcd.print(" Gas Leakage"); lcd.setCursor(0, 1); lcd.print(" SMS Sent"); delay(1000); digitalWrite(Red, HIGH); digitalWrite(Green, LOW); } else { Serial.print("Gas Level Low"); lcd.clear(); lcd.setCursor(0, 0); lcd.print("Gas Level Normal"); digitalWrite(Red, LOW); digitalWrite(Green, HIGH); delay(1000); } lcd.clear(); } |
SendMessage() Function
-
- This function is responsible for sending an SMS alert using the SIM800 GSM module.
- AT commands are sent via the
mySerialsoftware serial connection to configure the GSM module and send the SMS. - The destination phone number, message content, and control characters are sent sequentially.
- A delay is added to allow time for the SMS to be sent.
|
1 2 3 4 5 6 7 8 9 10 |
void SendMessage() { Serial.println("I am in send"); mySerial.println("AT+CMGF=1"); delay(1000); mySerial.println("AT+CMGS=\"+918830584864xx\"\r"); mySerial.println("Hi Prateek Gas Detected plz Open Windows And Check Your Gas Cylinder"); delay(100); mySerial.println((char)26); delay(1000); } |
Video
Conclusion
By following this guide, you have successfully built a gas leakage detector using an Arduino Nano, MQ135 sensor, I2C 16×2 LCD display, red and green LEDs, and a SIM800 GSM module. This project offers a cost-effective solution for gas leak detection with real-time alerts, ensuring safety in various environments. Experiment with different gases, improve the system’s accuracy and extend its functionality to meet your specific requirements. Always prioritize safety and take necessary precautions when dealing with gas-related projects.
Arduino Based Projects
