Smart Shopping Cart Using RC522 RFID & Arduino Nano
Smart Shopping Cart Using Arduino
Introduction
- Shopping malls are one of the most popular places to buy or shop for anything. That’s why in this article we discuss how you modify the technology we design a billing system that you just scan the product and they bill well automation generates in your trolly you do not go and wait for a long time for the billing counter.
- the shopping trolley is designed to just scan the RFID tag and the 16×2 LCDs the product name and total cost of the product. this technology offers convenience and ease for shoppers to do shopping and enjoy their experience.
Working
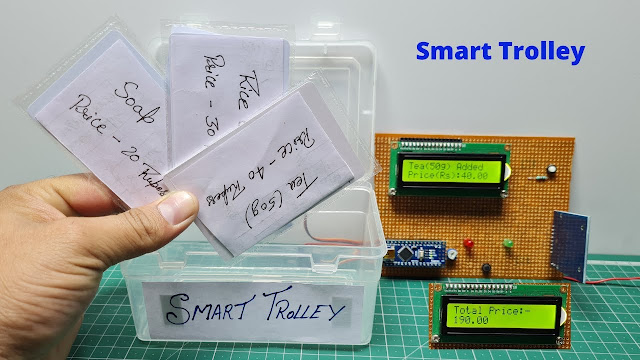
In a shopping mall all items in equipped with an RFID tag when a person puts an item in the trolley, its card will be scanned by the RFID reader and display the name, price, and total bill of the things inserted to buy it.
the 16×2 LCD will display the all data I mean how much the product you bought and the total cost of the product if you scan the card but you not interested in buying it then you just press and hold the push button and scan the same card the item will remove.
Component Need
S.N | Components | Quantity |
1 | Arduino Nano | 1 |
2 | 16x2 LCD Display (I2C) | 1 |
3 | RC-522 RFID Module | 1 |
4 | RC-522 RFID Tag | 4 |
5 | SG-90 Servo Motor | 1 |
6 | Red Led | 1 |
7 | Green Led | 1 |
8 | Zero PCB | 1 |
9 | 9v 2amp charger | 1 |
Arduino Nano
- in this project, we used the Arduino nano micro control because is small in size and the cost of the micro control is also less and easy to available in the market.
- the operating voltage of the controller is 5V.
RC-522 RFID Module
- The RC-522 RFID (Radio Frequency Identification) module is a popular and widely used RFID reader module.
- it is very easy to use and enables you to build various projects involving RFID technology.
- The module operates at a frequency of 13.56 MHz.
- the module operating voltage is 3.3v.
- the working on the SPI Protocol.
If You used the EM-18 RFID Module Then Check the Article Smart Shopping Cart Using RFID
RFID TAG
- The RC522 RFID tag, unique identification number or data. It is designed to be read by the RC522 module.
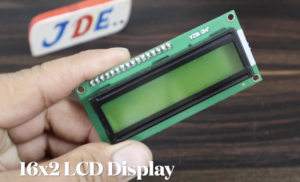
16×2 LCD Display with I2C
- A 16×2 LCD refers to a liquid crystal display with two rows and 16 characters.
- in this project, we used the 16×2 LCD with I2C Protocol through that’s means only 4 wire connections like SDA, SCL, VCC, And GND.
Push Button
- A 2-pin push button is a type of momentary switch that is commonly used in electronic circuits and systems.
- here we used the push button because if you scan any product and you are not interested in buying it’s just press and hold the push button scan the product tag then remove it.
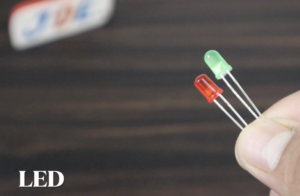
LED
An LED (Light Emitting Diode) is a type of semiconductor device that emits red light when an electric current is passed through it in the forward direction. It is one of the most common and widely used types of LEDs.
Circuit Diagram
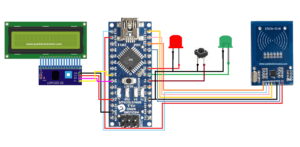
The circuit Diagram will show All Connection And Pin View How You connected the All Module.
- 16×2 LCD Display Is Connected to the I2C Protocol Is Used Only 4 Wire SCL, SDA, VCC, and GND.
- RC-522 RFID Module IS connected to the SPI Protocol and is connected to the pins 13,12,11,10,9 to Arduino nano.
- RED Led Will connected to Pin D6.
- Green Led Will Conected to Pin D5.
- Push Button Is Connected to The Pin D4.
- If you used the Sg-90 Servo Motor then connect it other wise is not compulsory if you connected then you used a PWM Pin D4.
Source Code
Before Uploading the code just upload the few Library
MFRC522
LiquidCrystal_I2C
First, find out the RFID Tag Number then just flow the code
|
1 2 3 4 5 6 7 8 9 10 11 12 13 14 15 16 17 18 19 20 21 22 23 24 25 26 27 28 29 30 31 32 33 34 35 36 37 |
#include <SPI.h> #include <MFRC522.h> #define SS_PIN 10 #define RST_PIN 9 MFRC522 rfid(SS_PIN, RST_PIN); MFRC522::MIFARE_Key key; void setup() { Serial.begin(9600); SPI.begin(); rfid.PCD_Init(); } void loop() { if (!rfid.PICC_IsNewCardPresent()) return; if (!rfid.PICC_ReadCardSerial()) return; MFRC522::PICC_Type piccType = rfid.PICC_GetType(rfid.uid.sak); Serial.print(F("RFID Tag UID:")); printHex(rfid.uid.uidByte, rfid.uid.size); Serial.println(""); rfid.PICC_HaltA(); } void printHex(byte *buffer, byte bufferSize) { for (byte i = 0; i < bufferSize; i++) { Serial.print(buffer[i] < 0x10 ? " 0" : " "); Serial.print(buffer[i], HEX); } } |
Now Change the RFID tag number And Upload the final Code.
|
1 2 3 4 5 6 7 8 9 10 11 12 13 14 15 16 17 18 19 20 21 22 23 24 25 26 27 28 29 30 31 32 33 34 35 36 37 38 39 40 41 |
#include <SPI.h> #include <MFRC522.h> #include <LiquidCrystal_I2C.h> #define SS_PIN 10 // SS pin for RC522 RFID reader #define RST_PIN 9 // RST pin for RC522 RFID reader MFRC522 mfrc522(SS_PIN, RST_PIN); LiquidCrystal_I2C lcd(0x27, 16, 2); void setup() { Serial.begin(9600); SPI.begin(); mfrc522.PCD_Init(); lcd.begin(16, 2); lcd.print("Smart Cart"); lcd.setCursor(0, 1); lcd.print("Ready to scan"); } void loop() { if (mfrc522.PICC_IsNewCardPresent() && mfrc522.PICC_ReadCardSerial()) { String tagUID = ""; for (byte i = 0; i < mfrc522.uid.size; i++) { tagUID += String(mfrc522.uid.uidByte[i] < 0x10 ? "0" : ""); tagUID += String(mfrc522.uid.uidByte[i], HEX); } mfrc522.PICC_HaltA(); lcd.clear(); lcd.print("Tag Detected:"); lcd.setCursor(0, 1); lcd.print(tagUID); delay(2000); lcd.clear(); lcd.print("Smart Cart"); lcd.setCursor(0, 1); lcd.print("Ready to scan"); } } |
Video
Conclusion
- The Smart Shopping Cart project utilizing an RC522 RFID reader, a 16×2 LCD, and an Arduino Nano offers a convenient and efficient solution for enhancing the shopping experience.
Smart Shopping Cart Using RFID





Can we buy this project and how much it will cost ?
Is the code provided in full?