Introduction
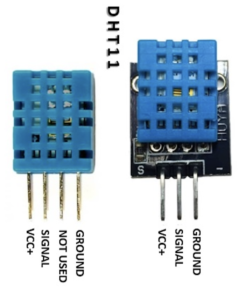
In this article, we interface The DHT11 temperature and humidity sensor is commonly used in college projects to find out the temperature and humidity of the environment. The sensor logic output is in digital format and is required only 5v. we will just interface the DHT11 Sensor with Arduino and we display the sensor reading in the serial monitor,16×2 LCD Display and OLED Display
Principle of Operation
They present a small chip that contains a capacitive humidity sensor and a thermistor for temperature measurement.
- Sensing Elements: It has two sensing elements: a humidity sensor and a temperature sensor. Humidity elements find out the moisture present in the air, and temperature elements find out the temperature.
- Analogue-to-Digital Conversion: The temperature & humidity in analog format and are converted into digital signals by an internal analogue-to-digital converter (ADC) within the sensor chip.
- Single-Wire Interface: The DHT11 sensor communicates single wire because its digital sensor is required only one digital Pin.
- Timing Protocol: The sensor responds by pulling the line low and then high to transmit the data.
- Data Transmission: The sensor data format is 40-bit binary. includes 16 bits for humidity, 16 bits for temperature, and 8 bits for a checksum.
- Calibration and Accuracy: The DHT11 sensor calibration is easy and the accuracy is not good but The DHT22 is higher Accuracy sensors.
- Power Requirements: 3.3V and 5V, to DC Voltage required.
Specifications of the DHT11 sensor
- Temperature Range: 0°C to 50°C (32°F to 122°F).
- Temperature Accuracy: ±2°C.
- Humidity Range: 20% to 90%.
- Humidity Accuracy: ±5%.
- Resolution: 1°C for temperature measurements & 1% for humidity measurements.
- Response Time: 2 seconds for temperature readings & 2-5 seconds for humidity readings.
- Supply Voltage: 3.3V and 5V DC.
- Current Consumption: 1.5mA
- Communication: single-wire (Digital Sensor).
- Sampling Rate: 2 seconds.
Advantages of the DHT11 sensor
- Cost-Effective
- Ease of Use
- Wide Availability
- Low Power Consumption
- Reliable Performance
- Compact Size
Disadvantages of DHT11 Sensor
- Limited Accuracy:
- Slower Response Time
- Limited Operating Range only 0°C to 50°C (32°F to 122°F)
- No Negative Temperature Measurement
Application of DHT11 Sensor
- Home Automation
- Weather Stations
- Greenhouses and Agriculture
- Indoor Environmental Monitoring
Example With Arduino,ESP01,ESP8266 And ESP32
Now We just interfacing the DHT11 sensor with Arduino and we just connected the sensor of the D4 pin number to Arduino. the DHT11 Sensor is a digital temperature sensor that’s why we used D4 Pin Number.
Code With Serial Monitor
Before you used the code is required to add a library for dht. h
|
1 2 3 4 5 6 7 8 9 10 11 12 13 14 15 16 17 18 19 20 21 22 23 24 25 26 27 28 29 30 31 32 |
#include <dht.h> #define dataPin 4 dht DHT; void setup() { Serial.begin(9600); } void loop() { int readData = DHT.read22(dataPin); float t = DHT.temperature; float h = DHT.humidity; Serial.print("Temperature = "); Serial.print(t); Serial.print(" "); Serial.print((char)176); Serial.print("C | "); Serial.print((t * 9.0) / 5.0 + 32.0); Serial.print(" "); Serial.print((char)176); Serial.println("F "); Serial.print("Humidity = "); Serial.print(h); Serial.println(" % "); Serial.println(""); delay(3000); } |
Circuit Diagram With 16×2 LCD Display
LCD Pin
|
1 |
lcd(12, 11, 10, 9, 8, 7); |
Code With 16×2 LCD Display
|
1 2 3 4 5 6 7 8 9 10 11 12 13 14 15 16 17 18 19 20 21 22 23 24 25 26 27 28 29 30 31 32 33 34 35 36 37 38 39 40 41 42 43 44 |
#include <LiquidCrystal.h> #include <dht.h> #define dataPin 4 LiquidCrystal lcd(12, 11, 10, 9, 8, 7); dht DHT; bool showcelciusorfarenheit = false; void setup() { lcd.begin(16,2); } void loop() { int readData = DHT.read22(dataPin); float t = DHT.temperature; float h = DHT.humidity; lcd.setCursor(0,0); lcd.print("Temp.: "); if(showcelciusorfarenheit) { lcd.print(t); lcd.print(" "); lcd.print((char)223); lcd.print("C"); showcelciusorfarenheit = false; } else { lcd.print((t * 9.0) / 5.0 + 32.0); lcd.print(" "); lcd.print((char)223); lcd.print("F"); showcelciusorfarenheit = true; } lcd.setCursor(0,1); lcd.print("Humi.: "); lcd.print(h); lcd.print(" %"); delay(3000); } |
DHT11 Sensor Interfacing With Arduino And Blutooth App
Circuit Diagram
Code
|
1 2 3 4 5 6 7 8 9 10 11 12 13 14 15 16 17 18 19 20 21 22 23 24 25 26 27 28 29 30 |
#include <SoftwareSerial.h> SoftwareSerial bt(8, 9); #include "dht.h" #define dataPin 3 dht DHT; int temp; int hum; void setup() { Serial.begin(9600); bt.begin(9600); Serial.println("Ready"); } void loop() { int readData = DHT.read11(dataPin); hum = DHT.humidity; temp = DHT.temperature; bt.print(temp); bt.print(";"); bt.print(hum); bt.println(";"); delay(10000); } |
DHT11 Sensor Interfacing With ESP8266 And OLED Display
Circuit Diagram
Code
|
1 2 3 4 5 6 7 8 9 10 11 12 13 14 15 16 17 18 19 20 21 22 23 24 25 26 27 28 29 30 31 32 33 34 35 36 37 38 39 40 41 42 43 44 45 46 47 48 49 50 51 52 53 54 55 56 57 58 59 60 61 62 63 64 65 |
#include <Wire.h> #include <Adafruit_GFX.h> #include <Adafruit_SSD1306.h> #include <Adafruit_Sensor.h> #include <DHT.h> #define SCREEN_WIDTH 128 #define SCREEN_HEIGHT 64 Adafruit_SSD1306 display(SCREEN_WIDTH, SCREEN_HEIGHT, &Wire, -1); #define DHTPIN D3 // Uncomment the type of sensor in use #define DHTTYPE DHT11 //#define DHTTYPE DHT22 //#define DHTTYPE DHT21 DHT dht(DHTPIN, DHTTYPE); void setup() { Serial.begin(115200); dht.begin(); if (!display.begin(SSD1306_SWITCHCAPVCC, 0x3C)) { Serial.println(F("SSD1306 allocation failed")); for (;;) ; } delay(2000); display.clearDisplay(); display.setTextColor(WHITE); } void loop() { delay(5000); float t = dht.readTemperature(); float h = dht.readHumidity(); if (isnan(h) || isnan(t)) { Serial.println("Failed to read from DHT sensor!"); } display.clearDisplay(); display.setTextSize(1); display.setCursor(0, 0); display.print("Temperature: "); display.setTextSize(2); display.setCursor(0, 10); display.print(t); display.print(" "); display.setTextSize(1); display.cp437(true); display.write(167); display.setTextSize(2); display.print("C"); display.setTextSize(1); display.setCursor(0, 35); display.print("Humidity: "); display.setTextSize(2); display.setCursor(0, 45); display.print(h); display.print(" %"); display.display(); } |
DHT11 Sensor Interfacing With ESP01 And Blynk App
Circuit Diagram
Code
|
1 2 3 4 5 6 7 8 9 10 11 12 13 14 15 16 17 18 19 20 21 22 23 24 25 26 27 28 29 30 31 32 33 34 35 36 37 38 39 40 41 |
#define BLYNK_PRINT Serial #include <SPI.h> #include <ESP8266WiFi.h> #include <BlynkSimpleEsp8266.h> #include <SimpleTimer.h> #include <DHT.h> char auth[] = "6497f4ca052e438e7157926730"; char ssid[] = "justdoelectronics"; char pass[] = "pratik123"; #define DHTPIN 0 #define DHTTYPE DHT11 DHT dht(DHTPIN, DHTTYPE); SimpleTimer timer; void sendSensor() { float h = dht.readHumidity(); float t = dht.readTemperature(); if (isnan(h) || isnan(t)) { Serial.println("Failed to read from DHT sensor!"); return; } Blynk.virtualWrite(V1, h); Blynk.virtualWrite(V2, t); } void setup() { Serial.begin(9600); Blynk.begin(auth, ssid, pass); dht.begin(); timer.setInterval(1000L, sendSensor); } void loop() { Blynk.run(); timer.run(); } |
DHT11 Sensor Interfacing With ESP32
Circuit Diagram
Code
|
1 2 3 4 5 6 7 8 9 10 11 12 13 14 15 16 17 18 19 20 21 22 23 24 25 26 27 28 29 30 31 32 33 34 35 36 37 38 39 40 41 42 43 44 45 46 47 48 49 50 51 52 53 54 55 56 57 58 59 60 61 62 63 64 65 66 67 68 69 70 71 72 73 74 75 76 77 78 79 80 81 82 83 84 85 86 87 88 89 90 91 92 93 94 95 96 97 98 99 100 101 102 103 104 105 106 107 108 109 110 111 112 113 114 115 116 117 118 119 120 121 122 123 124 125 126 127 128 129 130 131 132 133 134 135 |
#include "WiFi.h" #include "ESPAsyncWebServer.h" #include <Adafruit_Sensor.h> #include <DHT.h> const char* ssid = "justDo"; const char* password = "pratik123"; #define DHTPIN 15 #define DHTTYPE DHT11 DHT dht(DHTPIN, DHTTYPE); AsyncWebServer server(80); String readDHTTemperature() { float t = dht.readTemperature(); if (isnan(t)) { Serial.println("Failed to read from DHT sensor!"); return "--"; } else { Serial.println(t); return String(t); } } String readDHTHumidity() { float h = dht.readHumidity(); if (isnan(h)) { Serial.println("Failed to read from DHT sensor!"); return "--"; } else { Serial.println(h); return String(h); } } const char index_html[] PROGMEM = R"rawliteral( <!DOCTYPE HTML><html> <head> <meta name="viewport" content="width=device-width, initial-scale=1"> <link rel="stylesheet" href="https://use.fontawesome.com/releases/v5.7.2/css/all.css" integrity="sha384-fnmOCqbTlWIlj8LyTjo7mOUStjsKC4pOpQbqyi7RrhN7udi9RwhKkMHpvLbHG9Sr" crossorigin="anonymous"> <style> html { font-family: Arial; display: inline-block; margin: 0px auto; text-align: center; } h2 { font-size: 3.0rem; } p { font-size: 3.0rem; } .units { font-size: 1.2rem; } .dht-labels{ font-size: 1.5rem; vertical-align:middle; padding-bottom: 15px; } </style> </head> <body> <h2> ESP32 DHT Server</h2> <p> <i class="fas fa-thermometer-half" style="color:#059e8a;"></i> <span class="dht-labels">Temperature</span> <span id="temperature">%TEMPERATURE%</span> <sup class="units">°C</sup> </p> <p> <i class="fas fa-tint" style="color:#00add6;"></i> <span class="dht-labels">Humidity</span> <span id="humidity">%HUMIDITY%</span> <sup class="units">%</sup> </p> </body> <script> setInterval(function ( ) { var xhttp = new XMLHttpRequest(); xhttp.onreadystatechange = function() { if (this.readyState == 4 && this.status == 200) { document.getElementById("temperature").innerHTML = this.responseText; } }; xhttp.open("GET", "/temperature", true); xhttp.send(); }, 10000 ) ; setInterval(function ( ) { var xhttp = new XMLHttpRequest(); xhttp.onreadystatechange = function() { if (this.readyState == 4 && this.status == 200) { document.getElementById("humidity").innerHTML = this.responseText; } }; xhttp.open("GET", "/humidity", true); xhttp.send(); }, 10000 ) ; </script> </html>)rawliteral"; String processor(const String& var) { if (var == "TEMPERATURE") { return readDHTTemperature(); } else if (var == "HUMIDITY") { return readDHTHumidity(); } return String(); } void setup() { Serial.begin(115200); dht.begin(); WiFi.begin(ssid, password); while (WiFi.status() != WL_CONNECTED) { delay(1000); Serial.println("Connecting to WiFi.."); } Serial.println(WiFi.localIP()); server.on("/", HTTP_GET, [](AsyncWebServerRequest* request) { request->send_P(200, "text/html", index_html, processor); }); server.on("/temperature", HTTP_GET, [](AsyncWebServerRequest* request) { request->send_P(200, "text/plain", readDHTTemperature().c_str()); }); server.on("/humidity", HTTP_GET, [](AsyncWebServerRequest* request) { request->send_P(200, "text/plain", readDHTHumidity().c_str()); }); server.begin(); } void loop() { } |
Video
Conclusion
- In this article, we interface with the DH11 sensor but the response time of the sensor is not good slow we will try with the Arduino, ESP01, ESP8266 And ESP32 microcontrollers. if you want good response time then we suggest you used the DHT22 sensor but is a little bit costly.
Sensor


