Introduction
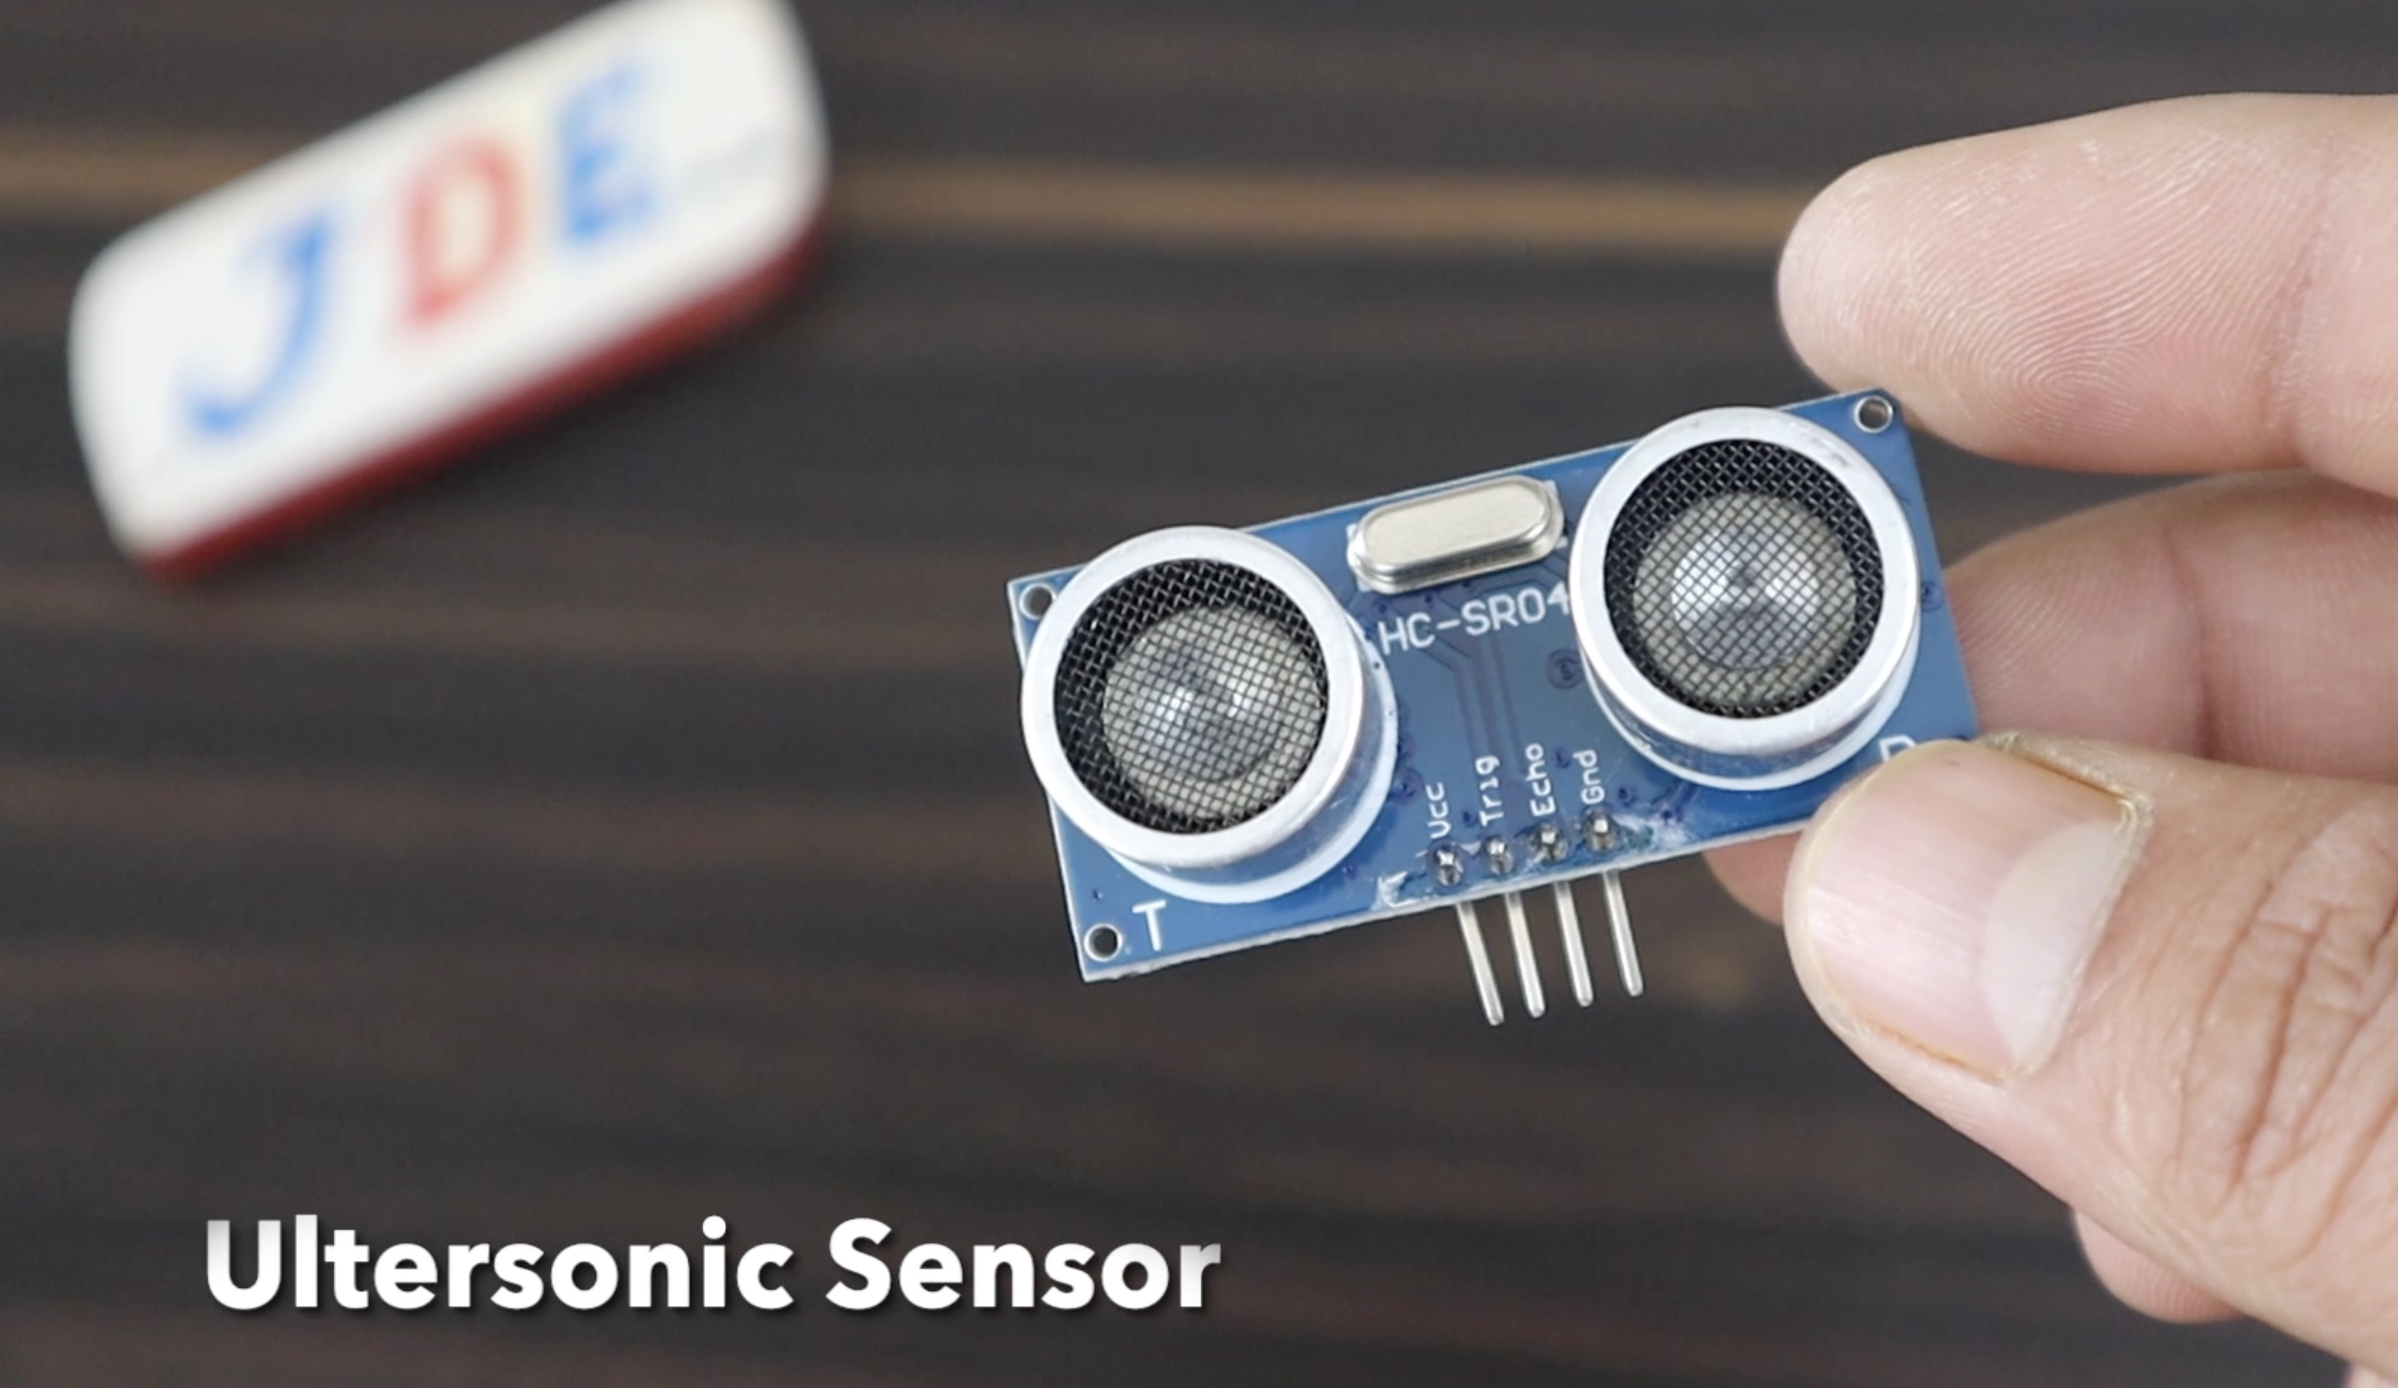
In This Article, we will discuss the HC-SR04 Ultrasonic Sensor the ultrasonic sensor is measuring the distance with respect to time. we will interface the ultrasonic sensor with Arduino and the value will display in the serial monitor as well as 16×2 LCD display.
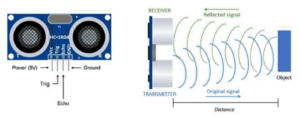
Pins HC-SR04 Ultrasonic Sensor
1. VCC: +5v DC
2. Trig: (INPUT)
3. Echo: (OUTPUT)
4. GND: GND
Principle of Operation
The HC-SR04 sensor works based on the principle of sound waves with frequencies higher than the audible range of humans and measures the time it takes for the waves to bounce back after hitting an object.
The sound wave travels at a speed of 340 m/s (0.034 cm/s).
we used the following equation to calculate the distance:- S = v * t
HC-SR04 ultrasonic sensor module consists of the following main components
- Transmitter: the 40kHz frequency used to operate and transmit emits ultrasonic pulses.
- Receiver: The receiver detects the echoes of the ultrasonic waves that bounce back after hitting an object.
- Control Circuit: the control circuit finds out the travel distance in time with the help of ultrasonic pulses and the reception of the echo signal.
- Trigger and Echo Pins: Trigger input is generated by the ultrasonic wave and just hit the surface and goes back to the receiver the echo is receive the ultrasonic wave and finds the total distance of the objects.
Measurement Range and Accuracy
They measure the distance of the trigger and echo based on the generated signal and they find out the total distance and the distance range is 2cm to 400cm.
the accuracy of the measurements depends on the factors of environmental conditions. and they also depend on the quality of the sensor.
To find out the distance use the formula Distance = (Time x SpeedOfSound) / 2.
Specifications of the HC-SR04 Sensor
- Operating Voltage: 3.3V and 5V.
- Operating Current: 15mA.
- Measurement Range: 2 cm to 400 cm (or 1 inch to 13 feet).
- Accuracy: Few millimetres
- Sensing Angle: Approximately 15 degrees. May not detect objects outside of this angle.
- Trigger Pulse Width: Minimum width of 10 microseconds.
- Echo Pulse Output: Ultrasonic pulse is transmitted and remains high until the echo is received.
- Communication Interface: Digital input/output pins to interface with microcontrollers or single-board computers. trigger is input and echo is output.
- Dimensions: Measures around 45 mm x 20 mm x 15 mm (length x width x height).
Advantages of HC-SR04 Sensor
- Non-Contact Measurement
- Wide Measurement Range
- High Accuracy
- Fast Response Time
- Easy to Use and Interface
- Low Power Consumption
- Affordable and Widely Available
Disadvantage of HC-SR04 Sensor
- Limited Angular Sensing
- Sensitivity to Environmental Factors
- Limited Resolution and Accuracy
- Blind Zone and Minimum Detection Range
Application of HC-SR04 Sensor
- Robotics
- Automation
- Parking Assistance
- Liquid Level Monitoring
- Security Systems
Example With Arduino
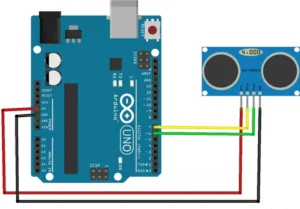
Circuit Diagram
Code
|
1 2 3 4 5 6 7 8 9 10 11 12 13 14 15 16 17 18 19 20 21 22 23 24 25 26 |
//Prateek //https://justdoelectronics.com //https://www.youtube.com/c/JustDoElectronics/videos const int trigPin = 7; const int echoPin = 6; long duration; int distance; void setup() { pinMode(trigPin, OUTPUT); pinMode(echoPin, INPUT); Serial.begin(9600); } void loop() { digitalWrite(trigPin, LOW); delayMicroseconds(2); digitalWrite(trigPin, HIGH); delayMicroseconds(10); digitalWrite(trigPin, LOW); duration = pulseIn(echoPin, HIGH); distance = duration * 0.034 / 2; Serial.print("Distance from the object = "); Serial.print(distance); Serial.println(" cm"); delay(1000); } |
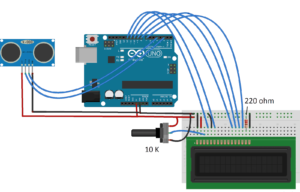
Circuit Diagram With 16×2 LCD Display
Code with 16×2 LCD Display
|
1 2 3 4 5 6 7 8 9 10 11 12 13 14 15 16 17 18 19 20 21 22 23 24 25 26 27 28 29 30 |
#include <LiquidCrystal.h> #define max_distance 200 LiquidCrystal lcd(12, 11, 10, 9, 8, 7); const int trigPin = 2; const int echoPin = 4; long duration; int distance; void setup() { lcd.begin(16, 2); pinMode(trigPin, OUTPUT); pinMode(echoPin, INPUT); } void loop() { digitalWrite(trigPin, LOW); delayMicroseconds(2); digitalWrite(trigPin, HIGH); delayMicroseconds(10); digitalWrite(trigPin, LOW); duration = pulseIn(echoPin, HIGH); distance = duration * 0.034 / 2; lcd.setCursor(0, 0); lcd.print("Distance: "); lcd.print(distance); lcd.print(" cm"); delay(500); } |
Code with OLED Display
|
1 2 3 4 5 6 7 8 9 10 11 12 13 14 15 16 17 18 19 20 21 22 23 24 25 26 27 28 29 30 31 32 33 34 35 36 37 38 39 40 41 42 43 44 45 46 47 48 49 50 51 52 53 54 55 56 57 58 59 60 61 62 63 |
#include <SPI.h> #include <Wire.h> #include <Adafruit_GFX.h> #include <Adafruit_SSD1306.h> #define trigPin 2 #define echoPin 4 #define OLED_RESET 4 Adafruit_SSD1306 display(OLED_RESET); void setup() { Serial.begin(9600); pinMode(trigPin, OUTPUT); pinMode(echoPin, INPUT); display.begin(SSD1306_SWITCHCAPVCC, 0x3C); display.clearDisplay(); } void loop() { float duration; float distance_cm; float distance_in; digitalWrite(trigPin, LOW); delayMicroseconds(2); digitalWrite(trigPin, HIGH); delayMicroseconds(10); digitalWrite(trigPin, LOW); duration = pulseIn(echoPin, HIGH); distance_cm = (duration / 2) / 29.1; distance_in = (duration / 2) / 73.914; display.setCursor(30, 0); display.setTextSize(1); display.setTextColor(WHITE); display.println("Range Finder"); display.setCursor(10, 20); display.setTextSize(2); display.setTextColor(WHITE); display.println(distance_cm); display.setCursor(90, 20); display.setTextSize(2); display.println("cm"); display.setCursor(10, 45); display.setTextSize(2); display.setTextColor(WHITE); display.println(distance_in); display.setCursor(90, 45); display.setTextSize(2); display.println("in"); display.display(); delay(500); display.clearDisplay(); Serial.println(distance_cm); Serial.println(distance_in); } |
Application
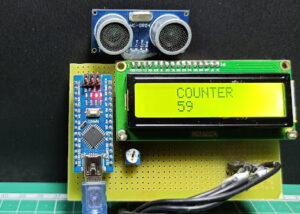
Ultrasonic Sensor as a Counter with Arduino
Video
- ESP32-CAM Intruder Alert
- Wireless Temperature Sensor Using Ultrasonic sensor
- Disinfection Tunnel Using Arduino
- Ultrasonic Sensor as a counter with Arduino
- Traffic Light Controller Using Arduino
- Automatic Lawn Mower Grass Cutter
- Smart Dustbin With GPS Location
- Flood Monitoring System Using GSM And ESP8266
- GSM Home Security Alarm With Arduino Uno
- Motion Detection Using Ultrasonic Sensor
- Smart Blind Stick With GPS Tracking System Using GSM
- Home Automation Using Esp8266 & Blynk2.0 App
- Dam Monitoring System Using Arduino And GSM
- Blind Stick With GPS And GSM
Related Projects

