Introduction
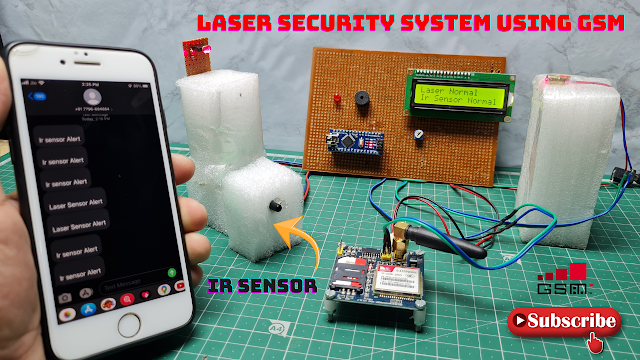
In this article, we will guide you through the process of creating a laser security system using readily available components such as the Arduino Nano, 16×2 LCD display, SIM900a GSM module, laser sensor, LDR module, buzzer, and LED. This DIY project aims to provide an effective and affordable solution for securing your premises.
A laser security system using Arduino is a project that utilizes laser beams and an Arduino microcontroller to create a basic security system. The system works by detecting interruptions or breaks in the laser beams to trigger an alarm or perform other actions.
Component Need
S.N | Components | Quantity | Link To Buy |
1 | Arduino Nano | 1 | |
2 | 16×2 LCD Display With I2C | 1 | |
3 | GSM Module(sim900a) | 1 | |
4 | Laser Module | 1 | |
5 | LDR Sensor | 1 | |
6 | IR Sensor | 1 | |
7 | Buzzer | 1 | |
8 | LED | 1 | |
9 | Wires | 1 | |
10 | PCB | 1 | |
11 | 9v Power supply | 1 |
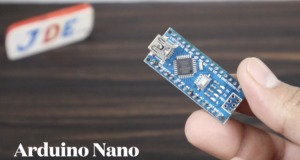
Arduino Nano
The Arduino Nano is a compact size microcontroller board based on the ATmega328P IC. It is part of the Arduino family of development boards with the popular Arduino environment. However, the Nano is small in size and is a total of 14 digital pins available and a total of 8 analogue pins available and also supports UART, SPI and I2C Communication.
ATmega328P microcontroller
- The clock speed of 16 MHz.
- The flash is memory of 32KB for storing the program code
- The SRAM for 2KB of data storage
- The EEPROM of 1KB for non-volatile storage.
- The digital and analog input/output pins can be used to interface with sensors, actuators, and other electronic components. It totals 14 digital I/O pins & 8 analog input pins.
The supports
- UART (Universal Asynchronous Receiver&Transmitter)
- SPI (Serial Peripheral Interface),
- I2C (Inter-Integrated Circuit).
- These all are interfaces with other devices such as sensors, displays, and wireless modules.
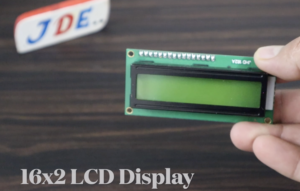
16×2 LCD Display
- A 16×2 LCD display is a liquid crystal display that can display 16 characters in two rows.
- The “16×2” notation indicates the number of character positions available on the display.
GSM Module(sim900a)
The SIM900 GSM/GPRS module is a versatile communication module that allows devices to connect to the Global System for Mobile Communications (GSM) network and transmit data over the General Packet Radio Service (GPRS).
- Supports multiple communication standards: including GSM, and GPRS.
- SIM card slot: This allows for easy insertion and removal of the SIM card. It provides the necessary to establish a connection with the GSM network.
- Serial communication interface: TTL-level UART interface USing The TX, RX And GND Pin.
- It requires a power supply in the range of 3.2V to 4.8V. it is important to Sure that a stable power source.
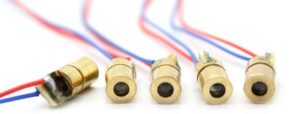
Laser Module
- Laser modules are compact electronic devices.
- The 650nm 6mm 5V DC laser module is a specific type of laser module that operates at a wavelength of 650 nanometers (nm) and requires a 5V direct current (DC) power supply.
- Working Principle: The laser diode within the module operates based on the principle of stimulated emission. When a suitable current is applied, it excites electrons in the semiconductor material, causing them to emit photons. These photons bounce between mirrored surfaces within the diode, stimulating the emission of further photons and resulting in the generation of a coherent laser beam at 650nm.
LDR Sensor
(LDRs)Light-dependent resistors: also known as photoresistors, is measuring the light intensity. and is also used in various field light measuring light meters, streetlights and camera exposure control.
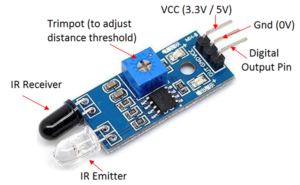
IR Sensor
Infrared (IR) sensors are Operated in 5V Dc Power Supply and are working on emitters and receivers when the receiver detects any movement the measures the intensity and is reflected.
- is includes the 10k pot to vary the distance and you just set your own threshold value.
- IR Sensor is a digital sensor is output signal is digital like 0 and 5V.
- IR Sensor includes the IR Emitter and IR Receiver is work like a transmitter and receiver.
Buzzer
Buzzers are electroacoustic devices that produce sound signals or tones. They are used in various of applications, including alarms, electronic devices, timers, and notification systems.
Circuit Diagram
The laser security system operates by constantly monitoring the laser beam’s integrity. When the laser beam is interrupted, indicating an intrusion, the system activates the alarm and sends an SMS alert to the user’s mobile phone. The LDR module helps avoid false alarms triggered by external light sources.
- The VCC and GND pins of the laser sensor to the 5V and GND pins of the Arduino nano.
- LDR sensor output pin connected to the analog pin A3 of the Arduino nano.
- The VCC and GND pins connected to the LCD display the 5V and GND pins of the Arduino Nano.
- The SDA and SCL pins are connected to the LCD display I2C pins on the Arduino board (A4 and A5).
- The positive terminal of the buzzer is connected to the digital pin 5 of the Arduino Nano.
- The Relay Module is connected to the digital pin 6 to the Arduino Nano.
- The LED connected to the digital pin 4.
Source Code
|
1 2 3 4 5 6 7 8 9 10 11 12 13 14 15 16 17 18 19 20 21 22 23 24 25 26 27 28 29 30 31 32 33 34 35 36 37 38 39 40 41 42 43 44 45 46 47 48 49 50 51 52 53 54 |
//Prateek //https://justdoelectronics.com #include <LiquidCrystal_I2C.h> #include <SoftwareSerial.h> LiquidCrystal_I2C lcd(0x27, 16, 2); SoftwareSerial SIM900(3, 2); String textForSMS; int data = 0; int sensor = A3; int buzzer = 5; int relay = 6; int led = 4; void setup() { randomSeed(analogRead(3)); Serial.begin(9600); SIM900.begin(9600); lcd.init(); lcd.backlight(); lcd.clear(); lcd.setCursor(0, 0); lcd.print("WelCome To"); lcd.setCursor(0, 1); lcd.print("JustDoElectronic"); delay(2000); lcd.clear(); pinMode(sensor, INPUT); pinMode(buzzer, OUTPUT); pinMode(relay, OUTPUT); pinMode(led, OUTPUT); digitalWrite(led, LOW); digitalWrite(relay, HIGH); digitalWrite(buzzer, LOW); } void loop() { data = analogRead(sensor); Serial.println(data); if (data > 400) { lcd.setCursor(0, 0); lcd.print("Laser .Alert"); digitalWrite(led, LOW); digitalWrite(relay, LOW); digitalWrite(buzzer, HIGH); } if (data < 400) { lcd.setCursor(0, 0); lcd.print("Laser Normal"); digitalWrite(led, HIGH); digitalWrite(relay, HIGH); digitalWrite(buzzer, LOW); } delay(50); } |
Code Explanation
- The first includes two libraries:
LiquidCrystal_I2C
SoftwareSerial
|
1 2 3 4 5 |
#include <LiquidCrystal_I2C.h> LiquidCrystal_I2C lcd(0x27, 16, 2); #include <SoftwareSerial.h> SoftwareSerial SIM900(3, 2); String textForSMS; |
- Here is define the input and output device Pins.
|
1 2 3 4 5 |
int data = 0; int sensor = A3; int buzzer = 5; int relay = 6; int led = 4; |
- In the
setup()function:- Define the input and output modules.
- Serial communication is started at a baud rate of 9600.
- Communication with the SIM900 GSM module is started at a baud rate of 9600.
- the welcome message is displayed on the LCD.
- Pin modes are set for the sensor, buzzer, relay, and LED.
- The LED, relay, and buzzer are initially turned off.
|
1 2 3 4 5 6 7 8 9 10 11 12 13 14 15 16 17 18 19 20 21 |
void setup() { randomSeed(analogRead(3)); Serial.begin(9600); SIM900.begin(9600); lcd.init(); lcd.backlight(); lcd.clear(); lcd.setCursor(0, 0); lcd.print("WelCome To"); lcd.setCursor(0, 1); lcd.print("JustDoElectronic"); delay(2000); lcd.clear(); pinMode(sensor, INPUT); pinMode(buzzer, OUTPUT); pinMode(relay, OUTPUT); pinMode(led, OUTPUT); digitalWrite(led, LOW); digitalWrite(relay, HIGH); digitalWrite(buzzer, LOW); } |
- In the
loop()function: - The analog reading from the sensor is stored in the
datavariable. - The value is printed on the serial monitor.
- If the value is greater than 400, it indicates that the laser has been interrupted, and an alarm is triggered:
- The LCD displays a “Laser . Alert” message.
- The LED is turned off.
- The relay is activated, which controls the external device.
- The buzzer is turned is indicate the alarm.
- If the value is less than 400, it indicates the system is in a normal state
- The LCD displays a “Laser Normal” message.
- The LED is turned on.
- The relay is deactivated.
- The buzzer is turned off.
|
1 2 3 4 5 6 7 8 9 10 11 12 13 14 15 16 17 18 19 |
void loop() { data = analogRead(sensor); Serial.println(data); if (data > 400) { lcd.setCursor(0, 0); lcd.print("Laser .Alert"); digitalWrite(led, LOW); digitalWrite(relay, LOW); digitalWrite(buzzer, HIGH); } if (data < 400) { lcd.setCursor(0, 0); lcd.print("Laser Normal"); digitalWrite(led, HIGH); digitalWrite(relay, HIGH); digitalWrite(buzzer, LOW); } delay(50); } |
Video
Conclusion
This DIY project offers an effective means of securing your premises by utilizing laser technology and incorporating features like SMS alerts, visual indicators, and audible alarms.Stay vigilant and keep your surroundings secure with your homemade laser security system.
Arduino Based Projects

