Introduction
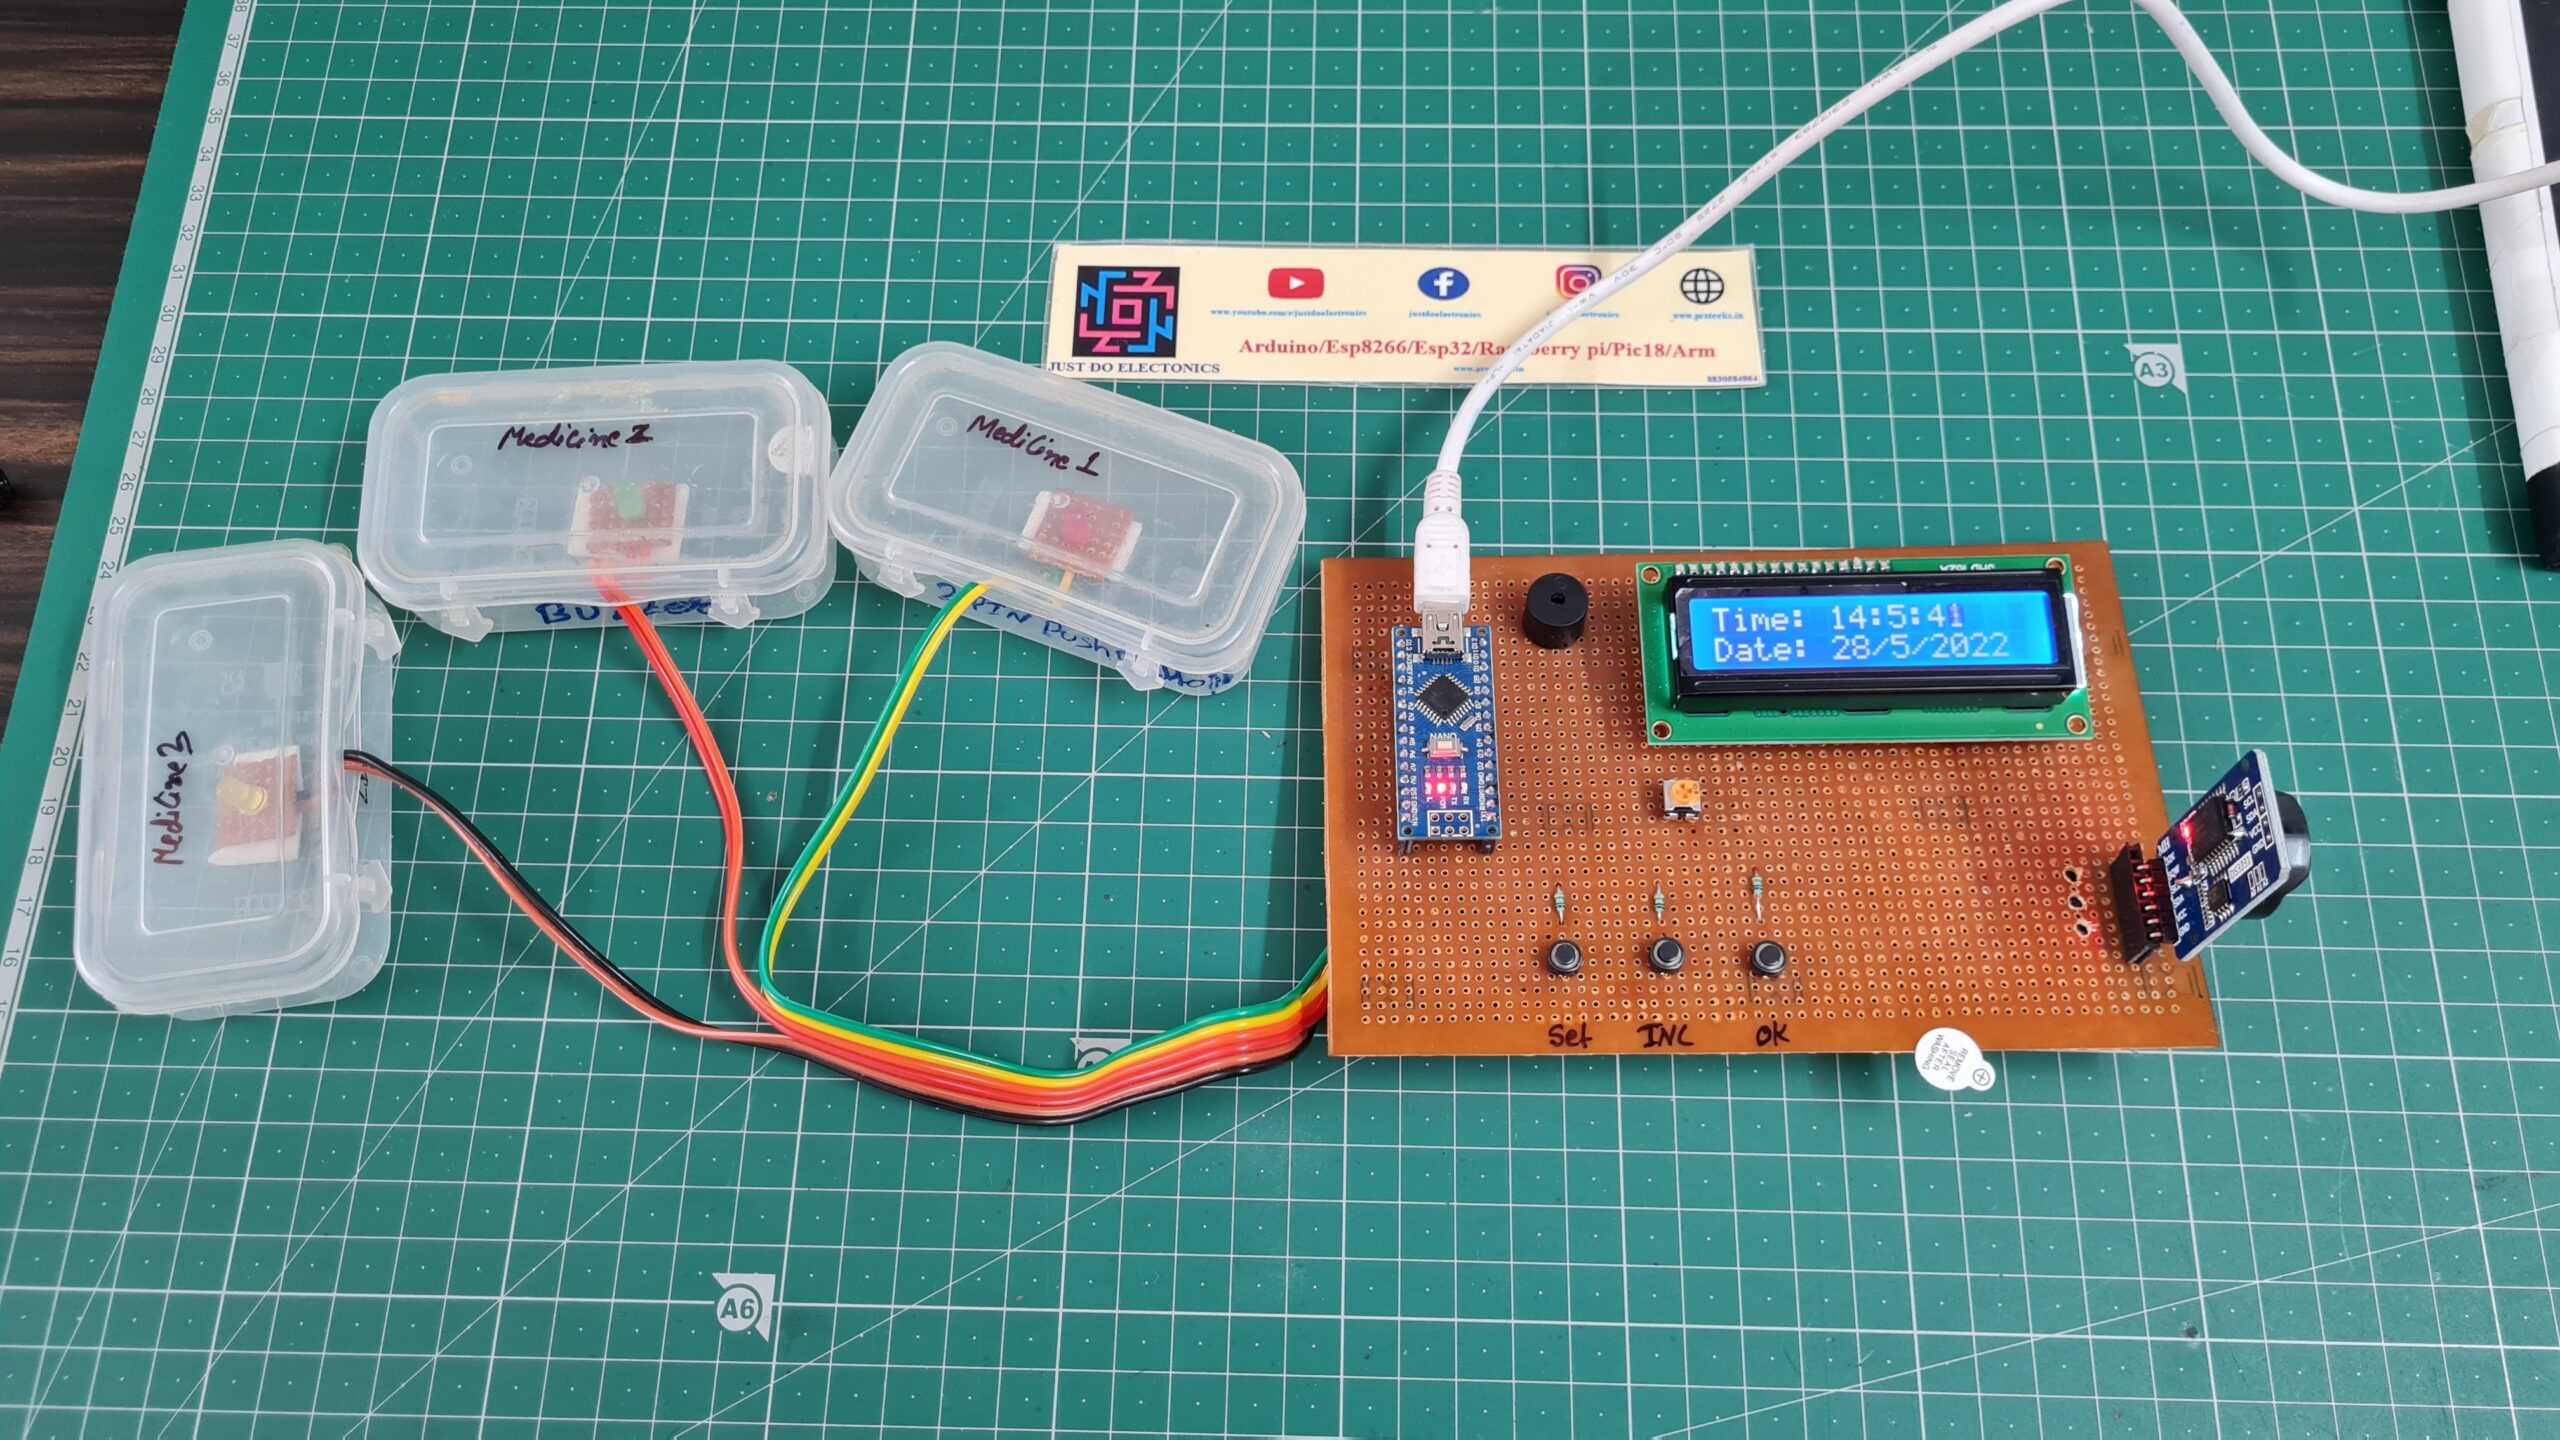
In this project, we are going to make RTC with Arduino Based Medicine Reminder System for Patients.
Because Many Times Patients forget to take their medicine on time. and if you do not medicate in a time then is not good. Sometimes patient also forgets which medicine has to take at the required Time. And is very Difficult for Doctors/fathers/Mothers to monitor patients around the Time. To avoid this problem we have made this Arduino-Based Medicine Reminder System For Patients.
Here We Also Chek More Projects
- DIY Ventilator Using Arduino
- Arduino Based Blind Stick With GPS And GSM
- Dam Monitoring System Using Arduino
Bill Of Material
Here Is the All Component List…
S.N | Component | Quantity | Link To Buy |
1 | Arduino Nano | 1 | |
2 | 16x2 LCD Display | 1 | |
3 | DS3231 RTC Module | 1 | |
4 | Buzzer | 1 | |
5 | Push Button | 3 | |
6 | 10K Resister | 3 | |
7 | 10K POT | 1 | |
8 | Zero PCB | 1 |
In this Image, we Will show all hardware components photos like Arduino nano, DS3231 RTC Module, LCD Display, or all small components.
Arduino Nano
In This System, we have used the Arduino nano to control the whole system.
16×2 LCD Display
the time and date will always show on the LCD And the LCD Will be connected to the Arduino pin D3, D4, D5, D6, and D7.
RTC DS3231 Module
In this system DS3231 real-time clock chip is used for running the time accurately and to prevent time failure by using a 3v li-on battery connected to the backside. They connected to the Arduino Pin A5 And A4.
Push Button
Set Alarm Time For medication we have used the Push Button and we set our own alarm time.
LED
After The alarm is completed the Led Will Glow And Indicate the box which medicine we take at that Time.
Buzzer
The buzzer is turned on when the alarm is completed
10K POT
this one is a 10k Pot and is used to very the Brightness of the LCD Display
Zero PCB
When I make Hardware first we put all components in a zero PCB And then Soldering it in the back Side.
How did it work?
Working on the Project is very simple. when we start this system real-time clock runs the time on the LCD. and if we want to set the alarm time for medication we have to press the set_button. After pressing this button LCD shows Set Time 1. and then we can select the time we want to set for medication by using the INC Button and the next Button previous process to set the time again. After the Second and Third Time Set the LCD the proper time And Date.
When Any Alarm occurs LCD Indicates Group Medicine 1, Group Medicine 2, Group Medicine 3. The modification Alarm time is also fed in Arduino internal EEPROM to save lost data after a failure.
Circuit Diagram
In this circuit diagram, the main part is the Arduino nano microcontroller we used the DS3231 RTC Module and they well connected to the Arduino Pin Numbers
- VCC To 5V
- GND To GND
- SCL To A5
- SDA To A4
When you start the system real-time clock runs in the LCD Display And LCD Will connect to the PIN number
- D3,D4,D5,D6,D7,D8
The Time we want to set for medication by Using the INC And NEXT buttons Previous Button And Will Connected To The PIN numbers A0, A1, A2
Led And Buzzer Will Connected To Red Led connected to the Pin Number D10, Yellow Led connected to the Pin Number D11, and Green Led Will connected to The Pin Number D12.also Buzzer Will be connected to the Pin Number A6.
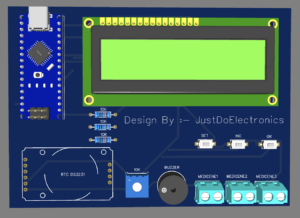
Now We Convert The Circuit Diagram Into the Proper PCB with the Help Of EasyEDA Software.
Now When We convert in the 3d View is relay locking good you just put the components is these Slots.
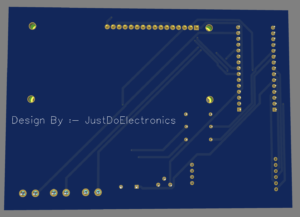
Now you also see the Back Side View of the PCB…
Source Code
The Source Code Of the Arduino Based Medicine Reminder Project and they Written on The Arduino IDE Software.
First We Add a Few libraries and then Upload The Code In the Arduino Nano microcontroller.
|
1 2 3 4 5 6 7 8 9 10 11 12 13 14 15 16 17 18 19 20 21 22 23 24 25 26 27 28 29 30 31 32 33 34 35 36 37 38 39 40 41 42 43 44 45 46 47 48 49 50 51 52 53 54 55 56 57 58 59 60 61 62 63 64 65 66 67 68 69 70 71 72 73 74 75 76 77 78 79 80 81 82 83 84 85 86 87 88 89 90 91 92 93 94 95 96 97 98 99 100 101 102 103 104 105 106 107 108 109 110 111 112 113 114 115 116 117 118 119 120 121 122 123 124 125 126 127 128 129 130 131 132 133 134 135 136 137 138 139 140 141 142 143 144 145 146 147 148 149 150 151 152 153 154 155 156 157 158 159 160 161 162 163 164 165 166 167 168 169 170 171 172 173 174 175 176 177 178 179 180 181 182 183 184 185 186 187 188 189 190 191 192 193 194 195 196 197 198 199 200 201 202 203 204 205 206 207 208 209 210 211 212 |
#include <Wire.h> #include <EEPROM.h> #include <RTClib.h> #include <LiquidCrystal.h> LiquidCrystal lcd(3,4,5,6,7,8); RTC_DS1307 RTC; int temp, inc, hours1, minut, add = 11; int next = A0; int INC = A1; int set_mad = A2; #define buzzer A6 int HOUR, MINUT, SECOND; void setup() { Wire.begin(); RTC.begin(); lcd.begin(16, 2); pinMode(INC, INPUT); pinMode(next, INPUT); pinMode(set_mad, INPUT); pinMode(buzzer, OUTPUT); lcd.setCursor(0, 0); lcd.print("Medicin reminder"); lcd.setCursor(0, 1); lcd.print(" Using Arduino "); delay(2000); if (!RTC.isrunning()) { RTC.adjust(DateTime(__DATE__, __TIME__)); } } void loop() { int temp = 0, val = 1, temp4; DateTime now = RTC.now(); if (digitalRead(set_mad) == 0) { lcd.setCursor(0, 0); lcd.print(" Set Medicine "); lcd.setCursor(0, 1); lcd.print(" Reminder time "); delay(2000); lcd.clear(); lcd.setCursor(0, 0); lcd.print("Enter Time 1"); defualt(); time(1); delay(1000); lcd.clear(); lcd.setCursor(0, 0); lcd.print("Enter Time 2"); defualt(); delay(1000); time(2); lcd.clear(); lcd.setCursor(0, 0); lcd.print("Enter Time 3"); defualt(); time(3); lcd.setCursor(0, 0); lcd.print("Medicin reminder"); lcd.setCursor(0, 1); lcd.print(" time has set "); delay(2000); } lcd.clear(); lcd.setCursor(0, 0); lcd.print("Time:"); lcd.setCursor(6, 0); lcd.print(HOUR = now.hour(), DEC); lcd.print(":"); lcd.print(MINUT = now.minute(), DEC); lcd.print(":"); lcd.print(SECOND = now.second(), DEC); lcd.setCursor(0, 1); lcd.print("Date: "); lcd.print(now.day(), DEC); lcd.print("/"); lcd.print(now.month(), DEC); lcd.print("/"); lcd.print(now.year(), DEC); match(); delay(200); } void defualt() { lcd.setCursor(0, 1); lcd.print(HOUR); lcd.print(":"); lcd.print(MINUT); lcd.print(":"); lcd.print(SECOND); } void time(int x) { int temp = 1, minuts = 0, hours = 0, seconds = 0; while (temp == 1) { if (digitalRead(INC) == 0) { HOUR++; if (HOUR == 24) { HOUR = 0; } while (digitalRead(INC) == 0) ; } lcd.clear(); lcd.setCursor(0, 0); lcd.print("Enter Time "); lcd.print(x); lcd.setCursor(0, 1); lcd.print(HOUR); lcd.print(":"); lcd.print(MINUT); lcd.print(":"); lcd.print(SECOND); delay(100); if (digitalRead(next) == 0) { hours1 = HOUR; EEPROM.write(add++, hours1); temp = 2; while (digitalRead(next) == 0) ; } } while (temp == 2) { if (digitalRead(INC) == 0) { MINUT++; if (MINUT == 60) { MINUT = 0; } while (digitalRead(INC) == 0) ; } lcd.clear(); lcd.setCursor(0, 0); lcd.print("Enter Time "); lcd.print(x); lcd.setCursor(0, 1); lcd.print(HOUR); lcd.print(":"); lcd.print(MINUT); lcd.print(":"); lcd.print(SECOND); delay(100); if (digitalRead(next) == 0) { minut = MINUT; EEPROM.write(add++, minut); temp = 0; while (digitalRead(next) == 0) ; } } delay(1000); } void match() { int tem[17]; for (int i = 11; i < 17; i++) { tem[i] = EEPROM.read(i); } if (HOUR == tem[11] && MINUT == tem[12]) { beep(); beep(); beep(); beep(); lcd.setCursor(0, 0); lcd.print(" Take Group One "); lcd.setCursor(0, 1); lcd.print(" Medicine "); beep(); beep(); beep(); beep(); } if (HOUR == tem[13] && MINUT == tem[14]) { beep(); beep(); beep(); beep(); lcd.setCursor(0, 0); lcd.print(" Take Group Two "); lcd.setCursor(0, 1); lcd.print(" Medicine "); beep(); beep(); beep(); beep(); } if (HOUR == tem[15] && MINUT == tem[16]) { beep(); beep(); beep(); beep(); lcd.setCursor(0, 0); lcd.print("Take Group Three "); lcd.setCursor(0, 1); lcd.print(" Medicine "); beep(); beep(); beep(); beep(); } } void beep() { digitalWrite(buzzer, HIGH); delay(500); digitalWrite(buzzer, LOW); delay(500); } |
Project Demo
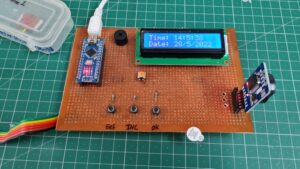
Now all the things are done you just check out the result in a few snapshots. just connected to the Arduino USB cable to the computer and when power is on the LCD will display the Welcome message.
LCD Will Display always real-time and date
With the help of the push button, we set the Medicine group Reminder…










sir display will not working is there any alternate connections