Flex Sensor Interfacing With Arduino
flex sensor interfacing with Arduino Nano & Measure Bend/Resistance
Introduction
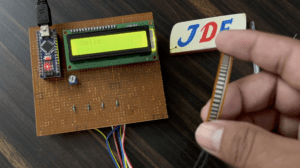
In this tutorial, we learn about flex sensors and their interfacing with Arduino nano microcontroller. we also interfacing 16×2 LCD Display just show the text message in LCD.
A Flex Sensor is a device to measures the amount of bend resistive change, the flex sensor is made of a variable resistive surface. the flex sensor resistance will change depending on bending. that’s why is sometimes called Flexible Potentiometer.
We learned in Toturial first we interface the Flex sensor with an Arduino nano microcontroller and take the reading in a serial monitor Then we interface the 16×2 LCD and display the different types of text messages On LCD.
Sign Language To Speech Conversion
Bill of Materials
S.N | Components Name | Quantity | Buy LInk |
1 | Arduino Nano | 1 | |
2 | 16x2 LCD Display | 1 | |
3 | Flex Sensor | 4 | |
4 | Resistor 10k | 4 | |
5 | 10k Pot | 1 |
Component Overview
Flex Sensor
Usually, the flex sensor is put on some surface and the resistance will change depending on the bending and how much band you the flex sensor. since the resistance is directly proportional to the amount of the bend.
market flex sensors are available in two different types and Sizes:- 1.2.2″(5.588cm) Length and 2.4.5″(11.43cm) length. and the width of the flex sensor is 0.6cm only.
flex sensor Type
- Conductive ink-based flex sensor
- Fiber optic flex sensor
- Capacitive flex sensor
- Velostat flex sensor
How do we interface the flex sensor with any microcontroller?
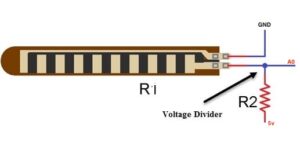
The Flex sensor is a variable resistor, the read by connecting it with a fixed value resistor of 10komh. the voltage divider network is required. One end of the flex sensor is connected to the GND and the other end is connected to the analogue input point like A0 of Arduino nano microcontroller. A 10kohm resistor is connected between A0 and +5v.
Circuit Diagram
Now interface the flex sensor with the Arduino nano board and calculate the value in the serial monitor.
- If you are trying to make a Sign Language To Speech Conversion project then visit this article Sign Language To Speech Conversion
Code
For Raw value In Serial Monitor
|
1 2 3 4 5 6 7 8 9 10 11 12 13 14 |
const int flexPin = A0; void setup() { Serial.begin(9600); } void loop() { int flexValue; flexValue = analogRead(flexPin); Serial.print("sensor: "); Serial.println(flexValue); delay(20); } |
Final Code
|
1 2 3 4 5 6 7 8 9 10 11 12 13 14 15 16 17 18 19 20 21 22 23 24 25 26 27 28 29 30 31 32 33 34 35 36 37 38 39 40 41 42 43 44 45 46 47 48 49 50 51 52 53 54 55 56 57 58 59 60 61 62 63 64 65 66 67 68 69 70 71 72 73 74 75 76 77 78 79 80 81 82 83 84 85 86 87 88 89 90 91 92 93 94 95 96 97 98 99 100 101 102 103 104 105 106 107 108 109 110 111 112 113 114 115 116 117 118 119 120 121 122 123 124 125 |
//Prateek //wwww.prateeks.in //www.justdoelectronics.com //https://www.youtube.com/c/JustDoElectronics/videos #include "SoftwareSerial.h" #include <LiquidCrystal.h> const int rs = 12, en = 11, d4 = 10, d5 = 9, d6 = 8, d7 = 7; LiquidCrystal lcd(rs, en, d4, d5, d6, d7); unsigned int f; unsigned int g; unsigned int h; unsigned int i; void setup() { Serial.begin(9600); Serial.println(); lcd.begin(16, 2); lcd.setCursor(0, 0); lcd.print(" Welcome To"); lcd.setCursor(0, 1); lcd.print("JustDoElectronic"); lcd.clear(); delay(3000); } void loop() { f = analogRead(0); g = analogRead(1); h = analogRead(2); i = analogRead(3); //Prateek //wwww.prateeks.in //www.justdoelectronics.com //https://www.youtube.com/c/JustDoElectronics/videos // Serial.print("f reading"); // Serial.println(f); // Serial.print("g reading"); // Serial.println(g); // Serial.print("h reading"); // Serial.println(h); if (f <= 722) { Serial.println("Plz Give Me Water"); lcd.clear(); lcd.setCursor(0, 0); lcd.print(" Hello "); delay(3000); lcd.clear(); lcd.setCursor(0, 0); lcd.print(" Please Read "); lcd.setCursor(0, 1); lcd.print(" All Text "); } else if (g <= 670) { //Prateek //wwww.prateeks.in //www.justdoelectronics.com //https://www.youtube.com/c/JustDoElectronics/videos Serial.println("Plz Give Me Food"); lcd.clear(); lcd.setCursor(0, 0); lcd.print(" Help Me"); delay(3000); lcd.clear(); lcd.setCursor(0, 0); lcd.print(" Please Read "); lcd.setCursor(0, 1); lcd.print(" All Text "); } else if (h <= 675) { Serial.println("Plz Give Me Tea"); lcd.clear(); lcd.setCursor(0, 0); lcd.print(" Save Me"); delay(3000); lcd.clear(); lcd.setCursor(0, 0); lcd.print(" Please Read "); lcd.setCursor(0, 1); lcd.print(" All Text "); //Prateek //wwww.prateeks.in //www.justdoelectronics.com //https://www.youtube.com/c/JustDoElectronics/videos } else if (i <= 655) { Serial.println("Plz Give Me Tea"); lcd.clear(); lcd.setCursor(0, 0); lcd.print(" My Name John"); lcd.setCursor(0, 1); lcd.print(" THANKS "); delay(3000); lcd.clear(); lcd.setCursor(0, 0); lcd.print(" Please Read "); lcd.setCursor(0, 1); lcd.print(" All Text "); //Prateek //wwww.prateeks.in //www.justdoelectronics.com //https://www.youtube.com/c/JustDoElectronics/videos } else { } delay(200); } |
Project Demo
- Now When we upload the code and give the proper power supply to the Arduino nano board the LCD the welcome message and displays the “Please read All Text” Message.
- Now We band the fist flex sensor the distance will change and Display the “Hello” message on the LCD Display.
- We Band the second flex sensor and then on this LCD we display the “Help Me” Message.
- When we band the third flex sensor the LCD will display the “Save Me” message.
You Also change the text message in a code and then you upload the code and use it.
Video
Conclusion
In this project, we learn about the flex sensor and how we take a reading in serial monitor and LCD. you also used the reading and did so many different tasks in your requirements.
More Arduino Tutorial


