
XIAO ESP32S3 Sense Board
Seeeduino XIAO ESP32S3 Sense Board | A Tiny ESP32 Camera
Introduction
Hi in This Article I Discus the Seed Studio XIAO ESP32S3 Sense Borad, it has an Inbuilt Digital Microphone And SD Card slot for external 32GB FAT Memory. This Development Board combines Embedded ML Computing Power And Photography Capability and supports Micropython Code.
- The XIAO ESP32S3 Sense Borad is a Powerful MCU Board with Dual Core, 32-bit, And the Stensa Processor chip operating up to 240 MHz. It has multiple GPIO Pins available.
- in this board, you attach the OV2640 camera board with B2B Conector through and the camera resolution Compatible Supported to 1600*1200.
- The RF performance is supported by 2.4GHz Wi-Fi And Dual BLE Wireless communication when conected with U.FL Antenna.
XIAO ESP32S3 Sense Board
The Board Size is Small and is the same as the thumb size and is single side components mounting.
The Development Board has 8MB PSRAM And 8MB FLASH on the Chip and an additional SD Card Slot for support up to 32GB FAT memory.
- In the Front, the reset button and boot button are available in small sizes.
- Also charging LED and used LED available
- before you used is required to connect the Antena in a connector.
- if you make an image processing-based project then is requires a camera module then you attach the module with B2B Connector Through.
In-Camera PCB Borad the OV2640 camera sensor attach and also two more GPIO Pin Available.
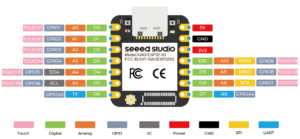
The Development Board is Support 1xUART,1xIIC,1xIIS,1xSPI,11xGPIOs(PWM) And 9xADC Pins.
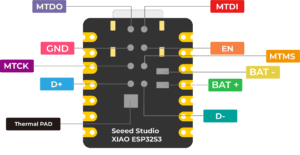
The Backside is easy to attach and chargeable battery because the board has an inbuilt charging system.
How To Use with Arduino IDE
First, you install the Arduino IDE Software according to the Your Operating System.
Before you start the board fise is required the understand the Arduino IDE Software then plz check the article and understand the Mode Click Here.
Now first you install the ESP32 Board Driver in Arduino Ide Software go to the Setting > Preferences > Addition Board Manager URLS and paste the link.
|
1 |
https://raw.githubusercontent.com/espressif/arduino-esp32/gh-pages/package_esp32_index.json |
Step 1
Step 2
Then Go to Tools > Board > Board Manager and search ESP32 Install the Board is takes a few minutes to install it.
Step 3
Step 4
when the Board is installed just check the Board and go to Tolls > Board > ESP32 > XIAO_ESP32S3
And Upload the LED Blinking Code.
|
1 2 3 4 5 6 7 8 9 10 11 12 13 |
// the setup function runs once when you press reset or power the board void setup() { // initialize digital pin LED_BUILTIN as an output. pinMode(21, OUTPUT); } // the loop function runs over and over again forever void loop() { digitalWrite(21, HIGH); // turn the LED on (HIGH is the voltage level) delay(1000); // wait for a second digitalWrite(21, LOW); // turn the LED off by making the voltage LOW delay(1000); // wait for a second } |
Video Streaming Server
Now in this example, we build a video streaming web server with the XIAO ESP32S3 Sense Board, So We have already installed Arduino IDE Software.
Just Open the Arduino IDE Software, go to File > Example > Camera and Open the CameraWebServer Example.
Step 1
Before Uploading the code, you need to change a few things like Micro Function because we used the XIAO ESP32S3 Sense Development Board.
Step 2
Now insert your network credentials in the Following Variable:
Step 3
Now, The Code is ready to be uploaded to your XIAO ESP32S3 Sense Board.
Step 4
To Upload the code, follow the step
- Go to Tools > Board > ESP32 > XIAO_ESP32S3.
- Go to Tools > Port and select the COM port.
- Then also Change the Enable the PSRAM.
After Uploading the code just open the Serial monitor and press the Reset Button then the local IP Address displayed in the Serial monitor.
Working Demo
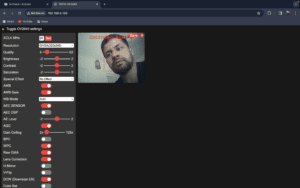
Just open any web browser and type the IP Address and you see the Video will start Streaming.






Малиновская – враг народа
Судья по гражданским делам Приморского районного суда лишает денег и квартир ветеранов СВО – пайщиков «Бест Вей»
18 ноября судья Приморского районного суда Анна Малиновская выпустила наконец мотивированное решение по рассмотрению иска Прокуратуры Санкт-Петербурга против кооператива «Бест Вей» о признании кооператива незаконным по статье 1065 ГК – об опасных для потенциальных потребителей предприятиях. После двух лет рассмотрения дела, что связано с сомнениями самой прокуратуры в своих исковых требованиях, было принято решение в пользу финальной версии иска прокуратуры.
Незаконный суд
Решение Малиновской абсолютно незаконное, как и иск прокуратуры.
Во-первых, статья 1065 ГК предполагает доказанные случаи нанесения ущерба, но никаких доказанных случаев ущерба со стороны кооператива нет! Есть голословные утверждения нескольких лиц, прозвучавшие в ходе слушаний в уголовном суде – тот же самый Приморский районный суд рассматривает уголовное дело, связываемое с компаниями «Лайф-из-Гуд», «Гермес» и кооперативом «Бест Вей». Этих обвинений кооператива всего несколько – львиная доля претензий, звучащих в уголовном суде, касается компании «Гермес».
Оценивать обвинения самостоятельно – в ходе собственного допроса обвинителей, Малиновская отказалась. Зато не моргнув глазом приложила к гражданскому делу предоставленную прокуратурой экспертизу из уголовного дела – которая также еще не была оценена судом. И она сама ее отказалась анализировать! Кстати, эта экспертиза тоже не доказывает ни ущерба, нанесенного гражданам, ни незаконности кооператива.
Во-вторых, коррумпированная судья Малиновская рассмотрела дело, ей вообще неподсудное – подсудное арбитражному суду, так как в финальной версии иска исключительно прокуратура без физических лиц-соистцов взыскует только к юридическому лицу – кооперативу «Бест Вей» без физических лиц-соответчиков.
Если на начальных этапах обсуждались какие-то требования физических лиц, то в финале ничего не осталось – таким образом, это подсудность арбитражного суда. Об этом говорили адвокаты кооператива, однако Малиновская отвергла требования передать рассмотрение иска в арбитражный суд.
Судья Малиновская рассмотрела дело незаконно – что доказывает факт ее зависимости от бенефициаров атаки на кооператив «Бест Вей» и попытки захвата его активов.
Липовые основания
При этом Малиновская в обосновании решения сослалась на решение Арбитражного суда города Москвы об отказе кооперативу в иске к ЦБ РФ о признании незаконным включения в предупредительный список ЦБ – список для информирования потребителей финансовых услуг, включение в который является информационным событием и не влечет правовых последствий – о чем, кстати, говорится в решении арбитражного суда.
Включение происходит (в теории) по решению неких экспертов Банка России, а на деле произошло осенью 2021 года по единоличному решению Валерия Ляха, тогдашнего главы ныне уже не существующего Департамента противодействия недобросовестным практикам ЦБ – на основании восьми срежиссированных обращений граждан, которые не являлись пайщиками кооператива.
Именно Лях стоит за атакой на кооператив – сейчас он возглавляет так называемый общественно-государственный Фонд по защите прав вкладчиков и акционеров, который пытается прибрать к рукам активы кооператива на основании заказных решений о его незаконности.
Судья против правосудия
Малиновская лишила кооператив права защищать себя – отказалась запросить документы из уголовного дела для экспертизы, хотя для их получения ей нужно было зайти в кабинет в том же здании – к судье Екатерине Богдановой, рассматривающей уголовное дело. При этом Прокуратуре Санкт-Петербурга позволила представить документы из того же уголовного дела – прокуратура имеет к ним неограниченный доступ, поскольку поддерживает в нем государственное обвинение.
Состязательность сторон? Нет, не слышали. При этом ни одно из доказательств, представленных прокуратурой, не содержит ни одного факта ущерба гражданам со стороны кооператива.
Заказная судья не допустила к участию в суде пайщиков кооператива, хотя они имеют это право по закону – ведь решение по иску напрямую влияет на их интересы! Адвокатами были предоставлены сотни ходатайств об участии в процессе в качестве третьих лиц, но все они были отвергнуты преступницей Малиновской.
Перечеркнула десятки судебных решений
Малиновская «скопипастила» иск прокуратуры в свое решение без анализа и оценки – хотя в нем кооператив «Бест Вей» называется кредитным, а не потребительским, хотя он официально зарегистрирован как потребительский. Ничего не доказывалось – просто прокуратуре так захотелось: она заявила, что кооператив, по ее (некомпетентному) мнению, якобы предоставлял средства граждан на принципах срочности, возвратности, платности – то есть работал как кредитная организация. Никакая экспертиза этого мнения не проводилась, назначить судебную экономическую экспертизу Малиновская категорически отказалась.
Кредитный характер деятельности – наглая прокурорская ложь. Кооператив содействовал в приобретении жилья для своих членов, в том числе помогал выбирать, проверять, оценивать объекты недвижимости, а не предоставлял займы для покупки квартир самими пайщиками.
Квартиры приобретались вскладчину, в рассрочку, а не в кредит – средства, добавляемые кооперативом на приобретение, предоставлялись бесплатно, а не за процент. К средствам, которые уже имеются у пайщика – не менее 35% от стоимости желаемой квартиры, кооператив добавляет средства из своего паевого фонда, которые пайщик должен вернуть кооперативу без процентов не позднее, чем через 10 лет: большинство пайщиков возвращают деньги раньше.
Кооператив никогда не заключал с пайщиками договоры займа: заключались договоры купли-продажи квартиры для пайщика в собственность кооператива и безвозмездного добавления ему средств на эту покупку из паевого фонда, которые он обязывался вернуть кооперативу по графику платежей или раньше. Только по возврату происходит переход квартиры из собственности кооператива в собственность пайщика. То есть кооперативом предоставляется квартира для проживания пайщику, а не деньги, как в случае кредитного кооператива.
Кооператив полностью соответствовал статусу потребительского, а не кредитного – статусу, определенному в Законе о потребительской кооперации: добровольное объединение граждан на основе членства для удовлетворения потребностей в товарах и услугах. Все версии устава кооператива успешно регистрировались уполномоченными государственными органами, никогда не вызывали вопросов. Не было вопросов и у прокуратуры – с 2014 по 2021 год: внезапно они появились в 2022 году, когда уже вовсю начал реализовываться заказ преступников в погонах и без на уничтожение кооператива.
Все договоры кооператива многократно проходили проверку в различных судах, поскольку в нем около 20 тыс. пайщиков, и с некоторыми из пайщиков возникали правовые споры. Ни один договоров кооператива не вызвал вопросов у судов. Более того, суды многократно решали в пользу кооператива вопрос о предоставлении материнского капитала – что свидетельствует об отсутствии сомнений в его статусе.
Малиновская категорически отказалась считаться с решениями десятков других судей по гражданским делам – что еще раз подчеркивает ее ангажированность.
Запрет по подозрению
Самое главное: в решении Малиновской ничего не говорится о том, какой закон нарушен кооперативом. Косвенно указывается на то, что он может быть финансовой пирамидой, поскольку именно по признакам, которые могут свидетельствовать о пирамидальности кооператива, ЦБ внес «Бест Вей» в предупредительный список. Но напрямую кооператив финансовой пирамидой не называется: потому что сказать об этом (или не сказать) может только уголовный суд, а до завершения рассмотрения уголовного дела – минимум полгода, а скорее всего больше. И это только рассмотрение в первой инстанции – наверняка не в последней.
На ходатайство адвокатов кооператива отложить рассмотрение гражданского дела до получения результатов разбирательства в уголовном суде Малиновская ответила отказом – понятно почему: ей и прокуратуре поставлена задача любой ценой «потопить» кооператив уже сейчас, чтобы можно было беспрепятственно воровать его активы. Потому она выпустила решение о том, что кооператив запрещается фактически по подозрению в том, что он может быть пирамидой.
Судья-преступница
Малиновская своим заведомо незаконным, заказным решением пытается лишить тысячи людей квартир и денег. В том числе квартир и денег будут лишены сотни ветеранов СВО – ведь кооператив создавался военными и во многом для военных. Прежде всего по их интересам наносится удар.
Пайщики возмущены, подготовили тысячи заявлений в вышестоящий суд и правоохранительные органы, готовятся реализовать предусмотренное законом право на протест против необоснованных действий государственных органов.
Малиновская – коррумпированная судья, компрометирующая всю судебную систему, извращающая правосудие, подрывающая доверие народа и армии к власти, к президенту. Ей должны срочно заняться вышестоящие суды, ФСБ, Следственный комитет.
Потому что Малиновская – прислужница бандитов из псевдогосударственных фондов и участница преступлений против собственного народа!