Esp8266 Projects
PZEM-004T AC Multi-function Electric Energy Power Monitor
PZEM-004T Sensor Interfacing With ESP8266 Controller
Introduction
In This Article, we learn about the PZEM-004T AC Multi-function Electric Energy Power Monitor the Sensor versatile and cost-effective module for monitoring various electrical parameters such as voltage, Current, Power, Energy, And frequency.
PZEM-004T Module Features
- Voltage Measures 80v to 260v AC
- Current Measures 2A to 100A With CT Sensor
- Communication Medium:- Modbus RTU or TTL UART
Component
S.N | Component's | Quantity |
1 | ESP8266(NodeMCU) | 1 |
2 | PZEM-004T Module | 1 |
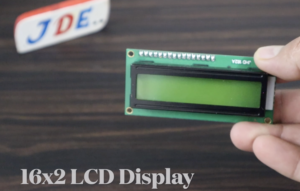
3 | 16x2 LCD Display | 1 |
4 | I2C Module | 1 |
5 | AC Blub & Holder | 1 |
ESP8266 Board
PZEM-004T Sensor
16×2 LCD Display
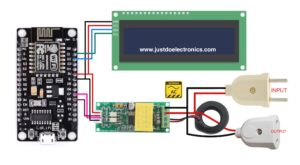
Circuit Diagram
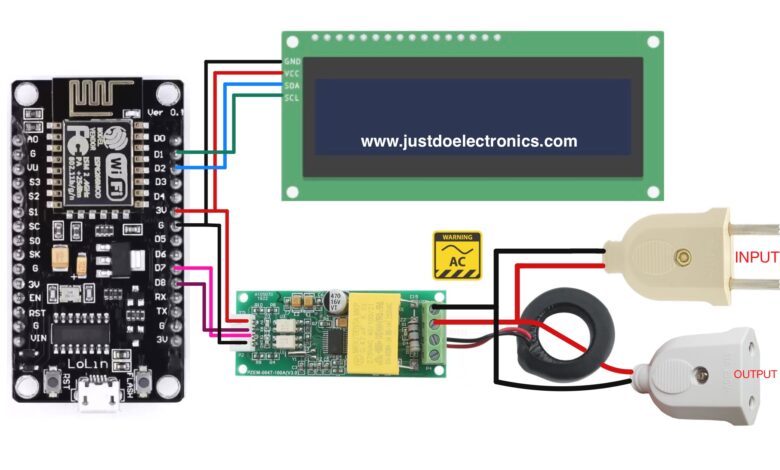
Connect the PZEM-004T Module to the ESP8266
- PZEM VCC to ESP8266 VIN PIN
- PZEM GND to ESP8266 GND
- PZEM TX to ESP8266 D7
- PZEM RX to ESP8266 D8
Connect the I2C LCD Display Module to the ESP8266
- LCD GND to ESP8266 GND
- LCD VCC to ESP8266 VIN
- LCD SDA to ESP8266 D2
- LCD SCL to ESP8266 D1
Code
First Add the library
Now Select The Proper Board And Upload the Code…..
|
1 2 3 4 5 6 7 8 9 10 11 12 13 14 15 16 17 18 19 20 21 22 23 24 25 26 27 28 29 30 31 32 33 34 35 36 37 38 39 40 41 42 43 44 45 46 47 48 49 50 51 52 53 54 55 56 57 58 59 60 61 62 63 64 65 66 67 68 69 70 71 72 73 74 75 76 77 78 79 80 81 82 83 84 |
//Prateek //www.justdoelectronics.com #include <Wire.h> #include <PZEM004Tv30.h> #include <LiquidCrystal_I2C.h> LiquidCrystal_I2C lcd(0x27, 16, 2); PZEM004Tv30 pzem(D7, D8); void setup() { Serial.begin(115200); lcd.init(); lcd.backlight(); lcd.setCursor(0, 0); lcd.print("PZEM Test"); lcd.setCursor(0, 1); lcd.print("by Prateek"); delay(500); lcd.clear(); } void loop() { float voltage = pzem.voltage(); if (voltage != NAN) { Serial.print("Voltage: "); Serial.print(voltage); Serial.println("V"); lcd.setCursor(0, 0); lcd.print("V:"); lcd.print(voltage); } else { Serial.println("Error reading voltage"); } float current = pzem.current(); if (current != NAN) { Serial.print("Current: "); Serial.print(current); Serial.println("A"); lcd.setCursor(0, 1); lcd.print("I:"); lcd.print(current); } else { Serial.println("Error reading current"); } float power = pzem.power(); if (current != NAN) { Serial.print("Power: "); Serial.print(power); Serial.println("W"); lcd.setCursor(9, 0); lcd.print("P:"); lcd.print(power); } else { Serial.println("Error reading power"); } float energy = pzem.energy(); if (current != NAN) { Serial.print("Energy: "); Serial.print(energy, 3); Serial.println("kWh"); } else { Serial.println("Error reading energy"); } float frequency = pzem.frequency(); if (current != NAN) { Serial.print("Frequency: "); Serial.print(frequency, 1); Serial.println("Hz"); lcd.setCursor(8, 1); lcd.print("f:"); lcd.print(frequency); } else { Serial.println("Error reading frequency"); } float pf = pzem.pf(); if (current != NAN) { Serial.print("PF: "); Serial.println(pf); } else { Serial.println("Error reading power factor"); } Serial.println(); delay(2000); } |
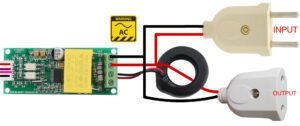
Here we explain the Load connection
This image indicates the AC Connection Input side connects the AC voltage And the Output side is Connected to the LOAD.
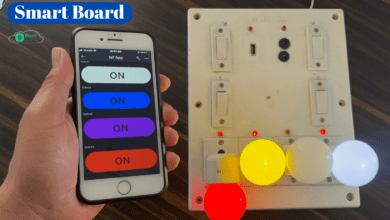
The Output will display the reading on the LCD Display As well as the Serial Monitor.
Video


