Floor Cleaning Robot Using Arduino
Build Your own Floor Cleaning Robot Using Arduino
Introduction
In This Article, we explain how to make your own floor-cleaning robot in your home, we just need a few components and you easy to make them. I will also explain the all features of the floor-cleaning robot.
the floor cleaning robot has many features you control the robot with the blutooth mobile app in manual mode and if you want to move the robot to autonomous mode then you just switch the sliding button and the automatic robot moves in manual mode to autonomous mode.
Robot Features
- Blutooth App Control
- Autonomous Mode
- LCD Display
- Water Pump Control
- Lithium-ion Batteries Operated
Components
S.N | Components | Quantity |
1 | Arduino Nano | 1 |
2 | 16x2 LCD Display | 1 |
3 | HC-05 Blutooth Module | 1 |
4 | Ultersonic Sensor | 3 |
5 | L298N Motor Driver | 1 |
6 | 100RPM Geared Motors | 2 |
7 | Motor Wheels | 2 |
8 | DC Water Pump | 1 |
9 | Lithium-ion Battery | 4 |
10 | Zero PCB | 1 |
11 | Small Sliding Switch | 1 |
12 | on/off Switch | 1 |
13 | 5v Realy Module | 1 |
14 | Soldring Wire | 10 |
15 | Spinning Mop | 1 |
16 | Perf Board | 1 |
17 | Screw | 15 |
Hardware Design
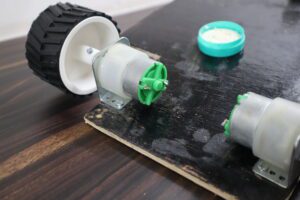
These all components needed to make this floor-cleaning robot
Now we soldering all the components in one zero PCB
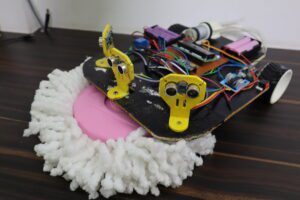
When we soldered all the components the robot look like this.
Circuit Diagram
Code
we upload the code using the Arduino IDE software
|
1 2 3 4 5 6 7 8 9 10 11 12 13 14 15 16 17 18 19 20 21 22 23 24 25 26 27 28 29 30 31 32 33 34 35 36 37 38 39 40 41 42 43 44 45 46 47 48 49 50 51 52 53 54 55 56 57 58 59 60 61 62 63 64 65 66 67 68 69 70 71 72 73 74 75 76 77 78 79 80 81 82 83 84 85 86 87 88 89 90 91 92 93 94 95 96 97 98 99 100 101 102 103 104 105 106 107 108 109 110 111 112 113 114 115 116 117 118 119 120 121 122 123 124 125 126 127 128 129 130 131 132 133 134 135 136 137 138 139 140 141 142 143 144 145 146 147 148 149 150 151 152 153 154 155 156 157 158 159 160 161 162 163 164 165 166 167 168 169 170 171 172 173 174 175 176 177 178 179 180 181 182 183 184 185 186 187 188 189 190 191 192 193 194 195 196 197 198 199 200 201 202 203 204 205 206 207 208 209 210 211 212 213 214 215 216 217 218 219 220 221 222 223 224 225 226 227 228 229 230 231 232 233 234 235 236 237 238 239 240 241 242 243 244 245 246 247 248 249 250 251 252 253 254 255 256 257 258 259 260 261 262 263 264 265 266 |
//Prateek //www.justdoelectronics.com #include <NewPing.h> #include <LiquidCrystal.h> LiquidCrystal lcd(12, 11, 10, 9, 8, 7); const int echo_L = A1; const int trig_L = A0; const int echo_M = A4; const int trig_M = A5; const int echo_R = A3; const int trig_R = A2; const int L1 = 6; const int L2 = 5; const int R1 = 4; const int R2 = 3; const int button = 13; const int pump = 2; int motor_speed = 255; int max_distance = 200; int distance_L = 0; int distance_M = 0; int distance_R = 0; char incomingByte; NewPing sonar_L(trig_L, echo_L, max_distance); NewPing sonar_M(trig_M, echo_M, max_distance); NewPing sonar_R(trig_R, echo_R, max_distance); void setup() { pinMode(L1, OUTPUT); pinMode(L2, OUTPUT); pinMode(R1, OUTPUT); pinMode(R2, OUTPUT); pinMode(button, INPUT); pinMode(pump, OUTPUT); digitalWrite(L1, LOW); digitalWrite(L2, LOW); digitalWrite(R1, LOW); digitalWrite(R2, LOW); digitalWrite(pump, LOW); lcd.begin(16, 2); lcd.print("Welcome!"); Serial.begin(9600); delay(2000); } void loop() { if (digitalRead(button) == LOW) { lcd.clear(); lcd.print("Manual Mode"); while (true) { manualMode(); if (digitalRead(button) == HIGH) { moveStop(); break; } } delay(100); } else { lcd.clear(); lcd.print("Automatic Mode"); while (true) { automaticMode(); if (digitalRead(button) == LOW) { moveStop(); break; } } delay(100); } } void manualMode() { if (Serial.available() > 0) { incomingByte = Serial.read(); } switch (incomingByte) { case 'F': moveForward(); lcd.clear(); lcd.print("Forward"); incomingByte = '*'; break; case 'B': moveBackward(); lcd.clear(); lcd.print("Backward"); incomingByte = '*'; break; case 'L': moveLeft(); lcd.clear(); lcd.print("Left"); incomingByte = '*'; break; case 'R': moveRight(); lcd.clear(); lcd.print("Right"); incomingByte = '*'; break; case 'S': moveStop(); lcd.clear(); lcd.print("Stop"); incomingByte = '*'; break; case 'P': digitalWrite(pump, HIGH); lcd.clear(); lcd.print("Pump ON"); incomingByte = '*'; break; case 'p': digitalWrite(pump, LOW); incomingByte = '*'; break; case '1': motor_speed = 155; incomingByte = '*'; break; case '2': motor_speed = 205; incomingByte = '*'; break; case '3': motor_speed = 255; incomingByte = '*'; break; delay(5000); } } void automaticMode() { distance_L = readSensor_L(); distance_M = readSensor_M(); distance_R = readSensor_R(); lcd.clear(); lcd.print("L="); lcd.print(distance_L); lcd.print("cm "); lcd.print("M="); lcd.print(distance_M); lcd.print("cm"); lcd.setCursor(0, 1); lcd.print("R="); lcd.print(distance_R); lcd.print("cm"); if (distance_M <= 20) { if (distance_R > distance_L) { if ((distance_R <= 20) && (distance_L <= 20)) { moveStop(); delay(200); moveBackward(); delay(2000); } else { moveBackward(); delay(500); moveRight(); delay(2000); } } else if (distance_R < distance_L) { if ((distance_R <= 20) && (distance_L <= 20)) { moveStop(); delay(200); moveBackward(); delay(2000); } else { moveBackward(); delay(500); moveLeft(); delay(2000); } } } else if (distance_R <= 15) { moveLeft(); delay(500); } else if (distance_L <= 15) { moveRight(); delay(500); } else { moveForward(); } } int readSensor_L() { delay(70); int cm_L = sonar_L.ping_cm(); if (cm_L == 0) { cm_L = 250; } return cm_L; } int readSensor_M() { delay(70); int cm_M = sonar_M.ping_cm(); if (cm_M == 0) { cm_M = 250; } return cm_M; } int readSensor_R() { delay(70); int cm_R = sonar_R.ping_cm(); if (cm_R == 0) { cm_R = 250; } return cm_R; } void moveForward() { digitalWrite(L1, LOW); analogWrite(L2, motor_speed); analogWrite(R1, motor_speed); digitalWrite(R2, LOW); } void moveBackward() { analogWrite(L1, motor_speed); digitalWrite(L2, LOW); digitalWrite(R1, LOW); analogWrite(R2, motor_speed); } void moveLeft() { analogWrite(L1, motor_speed); digitalWrite(L2, LOW); analogWrite(R1, motor_speed); digitalWrite(R2, LOW); } void moveRight() { digitalWrite(L1, LOW); analogWrite(L2, motor_speed); digitalWrite(R1, LOW); analogWrite(R2, motor_speed); } void moveStop() { digitalWrite(L1, LOW); digitalWrite(L2, LOW); digitalWrite(R1, LOW); digitalWrite(R2, LOW); } |
Blutooth App Configure
First You Download The Mobile App:- BlueTooth Serial
Testing
now we have done all the things and the robots will done now is time for testing we just attach the lithium ion battery and the robot will turn on and the LCD will display the mode.
we just select the manual mode:- manual mode which means we control the robot using the blutooth app.
now we select the Autonomous Mode the robot moves with the help of an ultrasonic sensor.
Conclusion
we just made the floor cleaning robot and is working nicely it means that controlling the robot mode is working fine but is attached 2 wheels I think if we add mode 2 wheels will work properly because sometimes they slip on the floor. in future, we try to design the robot in IOT Through and we put more sensors also. I hope we like this.
Video
Arduino Projects


