Introduction
In present days almost all people are familiar with robots. Robots will play a vital role in human life. Robots are Fast And they reduce human efforts on heavy work in industry, building etc. and make easy life. DTMF controlled Robot runs over the mobile DTMF technology that will exist on Dial tone. DTMF is defined as Dual Tone Multiple Frequency. Some frequencies will be used to create a tone.
In simple words adding, and mixing two or more frequencies generates a DTMF tone. DTMF is a Tone Multiple Frequency decoder module with an MT8870 DTMF decoder IC that will decode a DTMF tone signal to a digital signal that is acceptable for an Arduino digitally.
This type of wireless communication gives a remote handling operation of the Robot using the DTMF. A robot is an electro-mechanical machine which has been guided by a computer, Mobile phone or programming, and can do tasks on its own.
Bill Of Materials
S.N | Components | Quantity | Link To BUY |
1 | Arduino uno | 1 | |
2 | GSM (Sim 800l) | 1 | |
3 | Motor Driver (l293) | 1 | |
4 | Bo-Motor | 2 | |
5 | Li-Ion Battery | 3 |
Component Overview
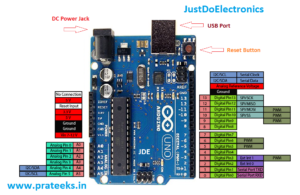
Arduino Uno
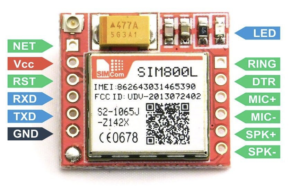
GSM (sim800l) Module
Motor Driver

Bo Motor

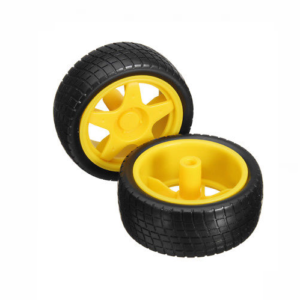
Bo Motor Wheels
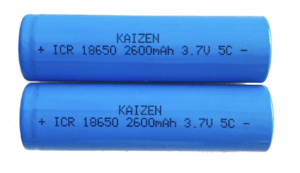
Li-Ion Battery
Working Overview
DTMF technology works by having the handset generate tones at a specific frequency and playing them over a phone line when a button is pressed on the keypad. Equipment at another end of the phone line listens to specific sounds and decodes them into commands. These commands are typically used to dial a phone number to call but can also be used to signal phone control commands or control remote equipment since the control tones are played in the same channel as the voice signal Itani’s an in-band signaling system this is different than out of band systems.
DTMF specifies eight different tones. They are divided into a high frequency and a low frequency. Each key press corresponds to two tones hence name a dual tone one from a high frequency and one from a low frequency. This allows for sixteen total keys. The Keypad keys are specified as 0 To 9, And *, # through. The All Keys letter is not generally used and they are omitted from the vast majority of consumer telephones.
Press "1" | Reverse |
Press "2" | Left |
Press "3" | Right |
Press "4" | Forward |
Press "5" | Stop |
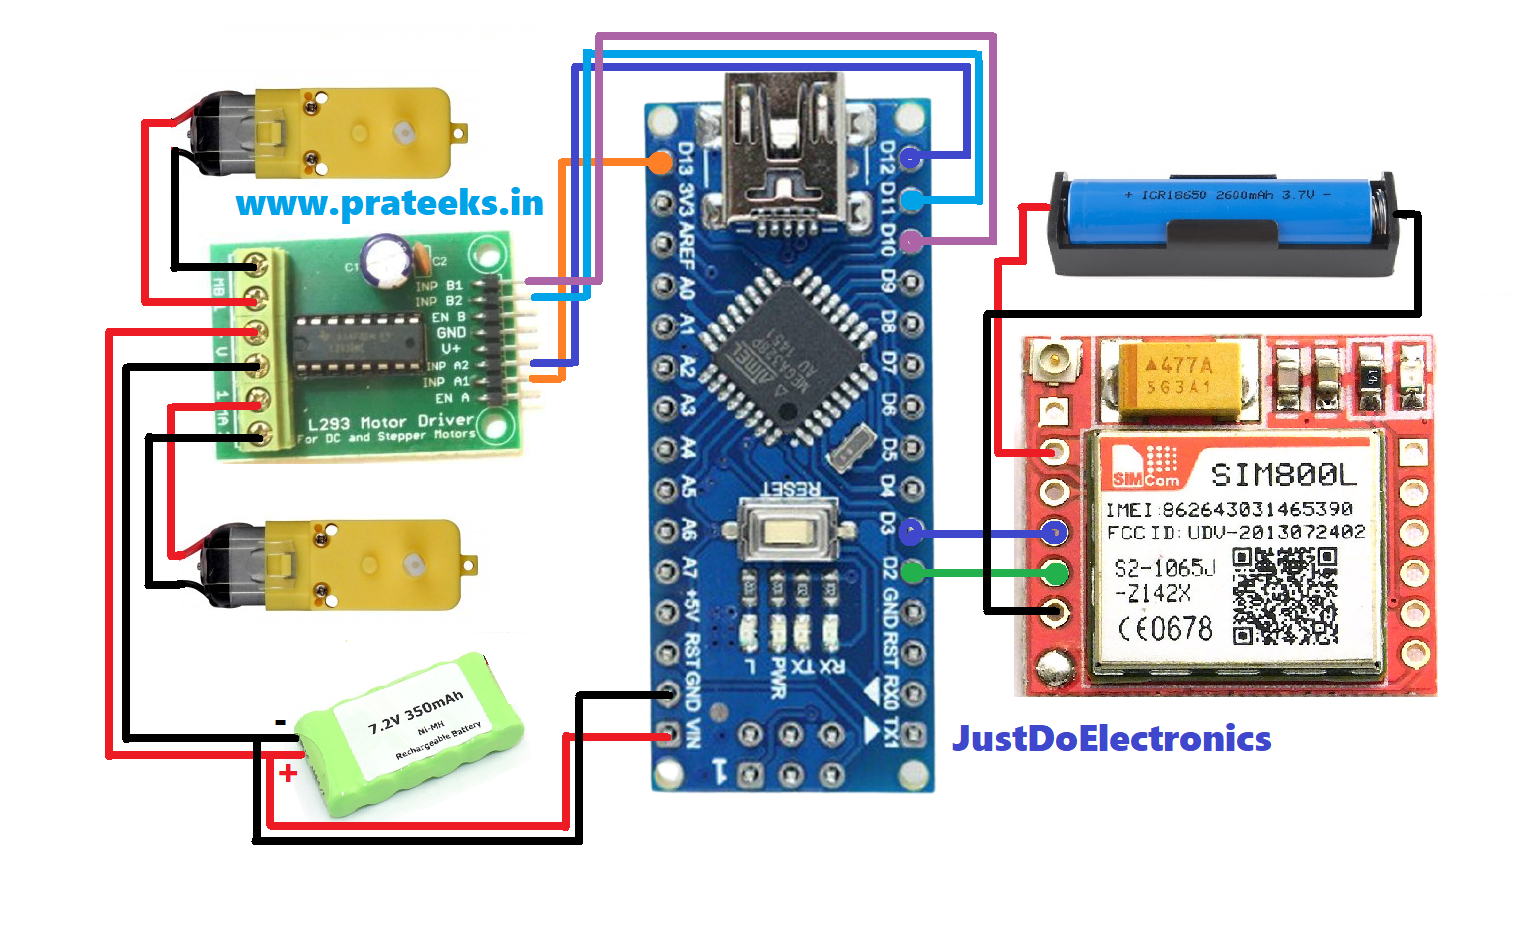
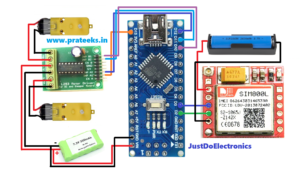
Circuit Diagram & Connection
Source Code & Program
|
1 2 3 4 5 6 7 8 9 10 11 12 13 14 15 16 17 18 19 20 21 22 23 24 25 26 27 28 29 30 31 32 33 34 35 36 37 38 39 40 41 42 43 44 45 46 47 48 49 50 51 52 53 54 55 56 57 58 59 60 61 62 63 64 65 66 67 68 69 70 71 72 73 74 75 76 77 78 79 80 81 82 83 84 85 86 87 88 89 90 91 92 93 94 95 96 97 98 99 100 101 102 103 104 105 106 107 108 109 110 111 112 113 114 115 116 117 118 119 120 121 122 123 124 125 126 127 128 129 130 131 132 133 134 135 136 137 138 139 140 141 142 143 144 145 146 147 148 149 150 151 152 153 154 155 156 157 158 |
//Prateek //www.prateeks.in #include "SoftwareSerial.h" # define SIM800L_Tx 3 # define SIM800L_Rx 2 SoftwareSerial SIM800L(SIM800L_Tx, SIM800L_Rx); char dtmf_cmd; bool call_flag = false; void init_gsm(); void update_robot(); void setup() { SIM800L.begin(9600); Serial.begin(9600); pinMode(13, OUTPUT); pinMode(12, OUTPUT); pinMode(11, OUTPUT); pinMode(10, OUTPUT); init_gsm(); } void loop() { String gsm_data; int x = -1; // Store serial data from SIM800L while (SIM800L.available()) { char c = SIM800L.read(); gsm_data += c; delay(10); } // Check if DTMF is receive from SIM800L if (call_flag) { x = gsm_data.indexOf("DTMF"); if (x > -1) { dtmf_cmd = gsm_data[x + 6]; Serial.println(dtmf_cmd); update_robot(); } x = gsm_data.indexOf("NO CARRIER"); if (x > -1) { // Terminate ongoing call when call is disconnected SIM800L.println("ATH"); call_flag = false; } } else { x = gsm_data.indexOf("RING"); if (x > -1) { delay(5000); SIM800L.println("ATA"); call_flag = true; } } } void init_gsm() { boolean gsm_Ready = 1; Serial.println("initializing GSM module"); while (gsm_Ready > 0) { SIM800L.println("AT"); Serial.println("AT"); while (SIM800L.available()) { if (SIM800L.find("OK") > 0) gsm_Ready = 0; } delay(2000); } Serial.println("AT READY"); boolean ntw_Ready = 1; Serial.println("finding network"); while (ntw_Ready > 0) { SIM800L.println("AT+CPIN?"); Serial.println("AT+CPIN?"); while (SIM800L.available()) { if (SIM800L.find("+CPIN: READY") > 0) ntw_Ready = 0; } delay(2000); } Serial.println("NTW READY"); boolean DTMF_Ready = 1; Serial.println("turning DTMF ON"); while (DTMF_Ready > 0) { SIM800L.println("AT+DDET=1"); Serial.println("AT+DDET=1"); while (SIM800L.available()) { if (SIM800L.find("OK") > 0) DTMF_Ready = 0; } delay(2000); } Serial.println("DTMF READY"); } void update_robot() { if (dtmf_cmd == '1') { //Reverse digitalWrite(12, HIGH); digitalWrite(10, HIGH); } if (dtmf_cmd == '2') { //Left digitalWrite(11, HIGH); } if (dtmf_cmd == '3') { //Right digitalWrite(13, HIGH); } if (dtmf_cmd == '4') { //Forward digitalWrite(13, HIGH); digitalWrite(11, HIGH); } if (dtmf_cmd == '5') { //Stop digitalWrite(13, LOW); digitalWrite(12, LOW); digitalWrite(11, LOW); digitalWrite(10, LOW); } } |
Demo Of Project
Now When You Call The GSM number The GSM Module Receives the call and DTMF will Be On
When You Press the “4” the Robot Will Be Going in a Reverse Direction

Ok, When you realize the “4” Button The Robot Will Stop, And When You Press “1” The Robot Will. Going To Reverse Direction.

If You Press 2 And 3 The Robot Will Move in the LEFT And Right Direction


Suppose if you Want To Stop The Robot You Just Press The Button Number “5” and The robot Will STOP.
Video Tutorial & Guide
Conclusion
The controlling of the robot can overcome the drawback of RF communication which has a limited range where this car can be controlled from anywhere just using the DTMF technology. It will provide Very Smooth control over a wide area Network of the service provider. The program used in the project gives very good control over the movement of the robot.


