How to make a WIFI controlled car using ESP32 and Blynk App
How to make a WIFI controlled car using ESP32 and Blynk App - step by step instructions
Introduction
Hi friends, welcome back. In this tutorial, we will make a small robot car controlled by the ESP32 Board. Also, this can be easily controlled by the New Blynk App with WIFI.
When The Power is on the circuit the WIFI is connected and is Conected to the Blynk Cloud via a WIFI Connection throughout.
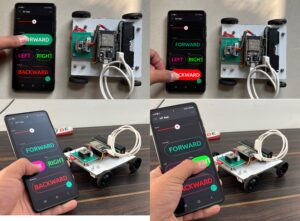
- Then, when you press the Commands Like(Forward, Backward, Left, Right) buttons on the Mobile Blynk app, those values are sent to the ESP32 Board via the Blynk cloud.
- Then, the N20 Gear Motor rotate according to these values. the DRV8833 2-Channel DC Motor Driver is used for the speed control of the N20 Motor.
We Explain the steps of how to make your robot car at home just follow the steps.
Bill Of Materials
S.N | Component's | Quanitity |
1 | ESP32 Board | 1 |
2 | DRV8833 2 Channel DC Motor Driver | 1 |
3 | N20 motor | 4 |
4 | N20 motor wheel | 4 |
5 | 3.7v lithium battery | 1 |
6 | 3.7v lithium battery holder | 1 |
7 | Zero PCb | 1 |
Component’s
ESP32 Board
Here we used the ESP32 Microcontroller because it has built-in WIFI And Blutooth and is also easy to available.
Features:-
- The ESP32 has built-in Wi-Fi support, allowing it to connect to wireless networks.
- ESP32 supports various communication protocols, including SPI (Serial Peripheral Interface), I2C (Inter-Integrated Circuit), and UART (Universal Asynchronous Receiver/Transmitter).
- Supply Voltage: 3.3 V ~ 5 V.
DRV8833 2 Channel DC Motor Driver
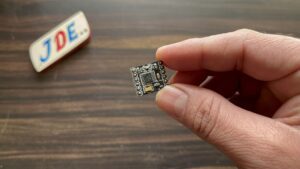
The DRV8833 Dual H-bridge motor driver IC can be used for bidirectional control of two brushed DC motors at 2.7 V to 10.8 V. It can supply up to about 1.2 A per channel continuously and can tolerate peak currents up to 2 A per channel for a few seconds.
N20 Motor (150-rpm)
The N20 Micro Gear 12V 1500 RPM DC Motor (High Torque) is a lightweight, high torque, and low RPM motor. It is equipped with a gearbox assembly to increase the torque of the motor.
With Motor Driver
N20 Wheels
3.7v lithium-ion battery
3.7V 3200mAH (Lithium Ion)Rechargeable Battery also known as Lipo batteries are thin, light and powerful. This battery has a capacity of 3200mAh.
Circuit Diagram
Here we design the circuit diagram and do the connection properly like the Motor Driver is conected to the ESP32 Board.
- IN1 – 13
- IN2 – 12
- IN3 – 14
- IN4 – 27
- VCC Is Connected to the Vin Pin and GND Will be Connected to the GND
- In OUPUT Side Is connected to the N20 Motor
- 3.7v Battery used to power up the circuit and also connect the one on/off switch
Hardware Design
Now we fix all N20 motors in the MDF Board And Soldring it with the help of Wire.
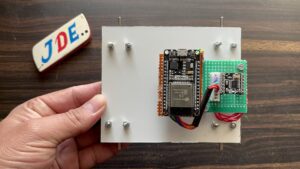
I put the ESP32 Board And Motor Driver Circuit on Top Of The MDF Board.
Code
Before you Upload The Code Is Required To Download The library and Few Changes in The Code.
Blynk Library — Download
First Change the Blynk Token ID key and WIFI User Name And password.
|
1 2 3 |
char auth[] = "DYU9lCCXER7N04IUexj1ultcz1cFfNl"; char ssid[] = "justdoelectronics"; char pass[] = "@12345"; |
Then You Select The Proper Board And Upload The Code To An ESP32 Board.
If You don’t Know how To Upload the code to ESP32 Board then first check the Article:- Basic Of ESP32 Board
|
1 2 3 4 5 6 7 8 9 10 11 12 13 14 15 16 17 18 19 20 21 22 23 24 25 26 27 28 29 30 31 32 33 34 35 36 37 38 39 40 41 42 43 44 45 46 47 48 49 50 51 52 53 54 55 56 57 58 59 60 61 62 63 64 65 66 67 68 69 70 71 72 73 74 75 76 77 78 79 80 81 82 83 84 85 86 87 88 89 90 91 92 93 94 95 96 97 98 99 100 101 102 103 104 105 106 107 108 |
//Prateek //https://justdoelectronics.com //https://www.youtube.com/@JustDoElectronics/videos #include <Wire.h> #include <WiFiClient.h> #include <BlynkSimpleEsp32.h> #define IN1 13 #define IN2 12 #define IN3 14 #define IN4 27 bool forward = 0; bool backward = 0; bool left = 0; bool right = 0; int Speed; char auth[] = "DYU9lCCXER7N04IUexj1ultcz1cFfNl"; char ssid[] = "justdoelectronics"; char pass[] = "@12345"; void setup() { Serial.begin(9600); pinMode(IN1, OUTPUT); pinMode(IN2, OUTPUT); pinMode(IN3, OUTPUT); pinMode(IN4, OUTPUT); Blynk.begin(auth, ssid, pass, "blynk.cloud", 80); } BLYNK_WRITE(V1) { forward = param.asInt(); } BLYNK_WRITE(V4) { backward = param.asInt(); } BLYNK_WRITE(V2) { left = param.asInt(); } BLYNK_WRITE(V3) { right = param.asInt(); } BLYNK_WRITE(V5) { Speed = param.asInt(); } void smartcar() { if (forward == 1) { carforward(); Serial.println("carforward"); } else if (backward == 1) { carbackward(); Serial.println("carbackward"); } else if (left == 1) { carturnleft(); Serial.println("carfleft"); } else if (right == 1) { carturnright(); Serial.println("carright"); } else if (forward == 0 && backward == 0 && left == 0 && right == 0) { carStop(); Serial.println("carstop"); } } void loop() { Blynk.run(); smartcar(); } void carforward() { digitalWrite(IN1, LOW); digitalWrite(IN2, HIGH); digitalWrite(IN3, HIGH); digitalWrite(IN4, LOW); } void carbackward() { digitalWrite(IN1, HIGH); digitalWrite(IN2, LOW); digitalWrite(IN3, LOW); digitalWrite(IN4, HIGH); } void carturnleft() { digitalWrite(IN1, HIGH); digitalWrite(IN2, LOW); digitalWrite(IN3, HIGH); digitalWrite(IN4, LOW); } void carturnright() { digitalWrite(IN1, LOW); digitalWrite(IN2, HIGH); digitalWrite(IN3, LOW); digitalWrite(IN4, HIGH); } void carStop() { digitalWrite(IN1, LOW); digitalWrite(IN2, LOW); digitalWrite(IN3, LOW); digitalWrite(IN4, LOW); } |
Blynk App Setup
In Blynk Steup just Flow The Step One By One Copy the Token ID in a Code.
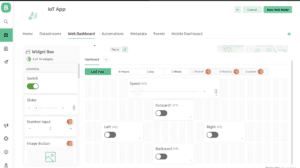
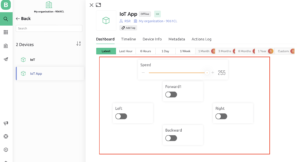
Now We Sucess fully created the Template then we went to the WebDesboard and Used The 4 Switch buttons and one Speed Control Slider.
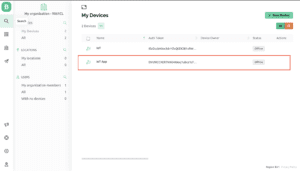
just go to the My Devices option select your template and use it.
Now Your app is ready to control the Small Robot Car. Just attach the battery and click the forward button, backward button, right button and left button.
Project Working
Video
Conclusion
In this Project we tried to design a small robot we used the ESP32 And DRV8833 Motor Drivers because the motor RPM Is Less That’s why the robot moves solely if you use more RPM motors Then it Moves Fast. but one advantage of the robot is powers up the whole circuit only the 3.7v battery.


