How to Set Up Raspberry Pi
Introduction
The Raspberry Pi is a powerful single-board computer with improved performance and enhanced capabilities compared to its predecessors. This guide will walk you through the step-by-step process of setting up your Raspberry Pi, from initial setup to connecting peripherals and installing the operating system.
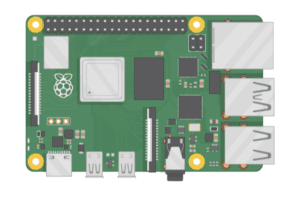
Raspberry Pi 4 board
-
Enhanced Performance – The Raspberry Pi 4 features a powerful Broadcom BCM2711 quad-core Cortex-A72 processor running at 1.5GHz, providing a significant performance boost compared to previous models. It offers faster application execution, improved multitasking capabilities, and smoother overall performance.
- Increased RAM Options – The Raspberry Pi 4 is available in three different RAM configurations: 2GB, 4GB, and 8 GB. This expanded memory capacity allows for more efficient multitasking, better performance in memory-intensive applications, and the ability to run more demanding software.
- Dual Micro HDMI Ports – The Raspberry Pi 4 is equipped with two micro HDMI ports, supporting up to dual 4K displays. This feature enables you to set up dual monitors for enhanced productivity or enjoy high-definition multimedia experiences.
- USB 3.0 and USB-C Power Supply – The Raspberry Pi 4 includes two USB 3.0 ports, which offer faster data transfer rates compared to USB 2.0. It also features a USB-C power supply port, providing improved power delivery and faster charging for the device.
- Gigabit Ethernet and Wireless Connectivity – The Raspberry Pi 4 comes with built-in Gigabit Ethernet, allowing for fast and reliable wired network connections. It also supports dual-band 2.4GHz and 5GHz Wi-Fi for wireless connectivity, enabling seamless internet access and networking capabilities.
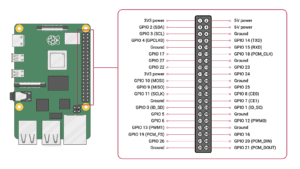
- GPIO Pins – Like previous Raspberry Pi models, the Raspberry Pi 4 features a 40-pin GPIO header that allows for easy connection to external devices and components. These general-purpose input/output pins enable you to interface with various sensors, actuators, and other electronics for project development.
- Storage Options – The Raspberry Pi 4 offers microSD card support for primary storage, allowing you to install and run the operating system and applications. Additionally, it provides two USB 3.0 ports and two USB 2.0 ports for connecting external storage devices, such as USB flash drives or hard drives.
- Camera and Display Interfaces – The Raspberry Pi 4 is equipped with a dedicated CSI camera interface, enabling easy connection to a Raspberry Pi camera module for capturing images and videos. It also features a DSI display interface for connecting a touch-enabled display, making it suitable for various multimedia and interactive applications.
- Software Support – The Raspberry Pi 4 is supported by a robust ecosystem and a wide range of operating systems, including the official Raspberry Pi OS (formerly Raspbian), Ubuntu, and several Linux distributions. It also has compatibility with popular programming languages, libraries, and software tools, making it a versatile platform for learning, prototyping, and development.
Before you begin, gather the following items:
- Raspberry Pi 4 board or any Rpi board
- MicroSD card (minimum 8GB recommended)
- Power supply (USB-C, with a minimum output of 3A)
- HDMI cable
- USB keyboard and mouse
- Monitor or TV with HDMI input
- Internet connection
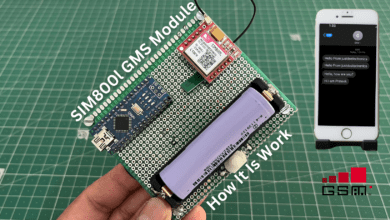
Related Rpi More Projects
Install OS
Prepare the MicroSD Card: To get started, prepare the MicroSD card with the Raspberry Pi 4’s operating system. Follow these steps:
- Insert the MicroSD card into your computer’s card reader.
- Download the latest version of the Raspberry Pi OS from the official website (https://www.raspberrypi.org/software/operating-systems/).
- Use an imaging tool like Etcher (https://www.balena.io/etcher/) to write the Raspberry Pi OS image to the MicroSD card.
- Once the writing process is complete, safely eject the MicroSD card.
Material Requirements
Connect Peripherals: Now, connect the necessary peripherals to your Raspberry Pi 4:
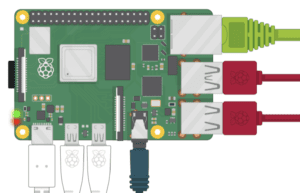
- Connect the HDMI cable from the Raspberry Pi 4’s HDMI port to your monitor or TV.
- Attach the USB keyboard and mouse to the USB ports on the Raspberry Pi 4.
- Ensure the MicroSD card with the operating system is inserted into the Raspberry Pi 4’s MicroSD card slot.
- Connect the power supply to the Raspberry Pi 4’s USB-C power input.
Power Up and Initial Setup
- Plug in the power supply to start the Raspberry Pi 4.
- Wait for the Raspberry Pi logo to appear on the screen.
- Select your language, time zone, and keyboard layout on the initial setup screen.
- Set a password for the default user account (pi).
- Connect to your Wi-Fi network by selecting your network name and entering the password (if applicable).
- Allow the system to complete the setup process.
Update and Upgrade
To ensure your Raspberry Pi 4 has the latest software packages, open the terminal and run the following commands:
|
1 2 |
sudo apt update sudo apt upgrade |
Follow the prompts and wait for the updates to complete.
Explore and Customize: Now that your Raspberry Pi 4 is up and running, you can explore its capabilities and customize it according to your needs. Some suggested steps to consider:
- Configure the Raspberry Pi 4’s settings by running
sudo raspi-configin the terminal. This will allow you to adjust various system configurations. - Install additional software packages using the
aptpackage manager. - Set up SSH access to remotely control your Raspberry Pi 4.
- Explore GPIO programming and connect external devices to interact with the physical world.
Conclusion
Setting up a Raspberry Pi 4 is a straightforward process that involves preparing the MicroSD card, connecting peripherals, powering up the device, and completing the initial setup. Once set up, you can start exploring Raspberry Pi’s capabilities and embark on exciting projects leveraging this versatile single-board computer. Enjoy your Raspberry Pi 4 and the endless possibilities it offers.

