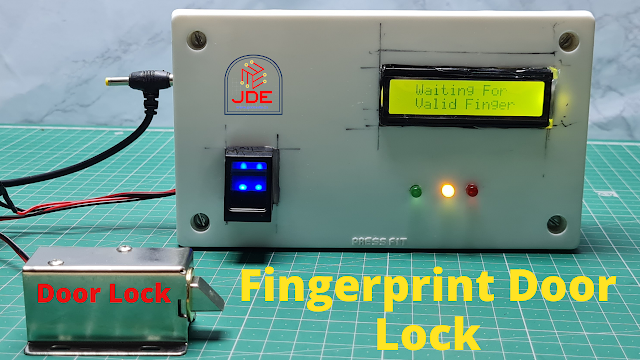
Fingerprint Door Lock System
Biometric Security System with Arduino and Fingerprint Sensor
Introduction
In today’s world, security plays a crucial role in our everyday lives. One innovative solution is a fingerprint door lock system that offers enhanced security and convenience. In this article, we will explore how to build a fingerprint door lock system using Arduino, a versatile microcontroller platform. By following the steps outlined below, you can create your own biometric security system.
If you are interested in more Project Related to the Fingerprint Sensor
- Smart Bike And Car Starter
- Fingerprint Sensor-Based Biometric Security System
- Rfid And Fingerprint Based Bike And Car Ignition System
- Fingerprint And Alcohol Sensor-Based Bike Ignition System
- Fingerprint And Rfid Based Bike And Car Ignition Systems
- Fingerprint-Based Biometric Voting Machine Project
Bill of Materials
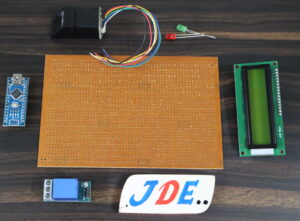
S.N | Component | Quantity | Link To Buy |
1 | Arduino nano | 1 | |
2 | R-307 Fngerprint Sensor | 1 | |
3 | 5V 1 Channel Moduule | 1 | |
4 | 16x2 LCD Display | 1 | |
5 | Solenoid lock | 1 | |
6 | Red Led | 1 | |
7 | Green Led | 1 | |
8 | Buzzer | 1 | |
9 | Zero PCB | 1 | |
10 | 12v Dc Supply | 1 |
R-307 Fingerprint Sensor
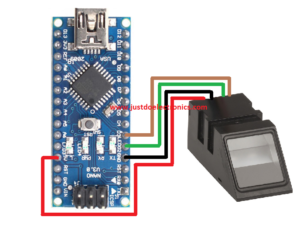
- We Used the R-307 Fingerprint Sensor And They connected To the Pin Numbers D2 And D3
- Fingerprint Sensor Connected to the UART Through Is Only 2 Pin Communication System
Fingerprint sensors are electronic devices that capture and analyze the unique patterns of ridges and valleys on an individual’s fingertip. They are commonly used for biometric authentication, as fingerprints are unique to each person and can be used as a reliable means of identification.
- Image Capture: When a finger is placed on the sensor, it uses various technologies (such as optical, capacitive, or ultrasonic) to capture an image of the fingerprint. The sensor detects the ridges and valleys on the fingertip’s surface and converts them into a digital representation.
- Image Enhancement: The captured image may undergo enhancement techniques to improve its quality and clarity. This can involve removing noise, adjusting contrast, and enhancing details to ensure accurate fingerprint recognition.
- Feature Extraction: The fingerprint sensor analyzes the captured image and extracts specific features or minutiae points. These features may include ridge endings, bifurcations, and other unique characteristics of the fingerprint.
- Template Creation: Based on the extracted features, a mathematical representation of the fingerprint called a template is created. This template is a compact representation of the fingerprint that can be stored and compared for future authentication purposes.
- Matching and Authentication: When a user attempts to authenticate using their fingerprint, the sensor captures a new image and creates a template from it. This template is then compared to the stored templates in a database or memory. If there is a match within an acceptable threshold, the authentication is successful.
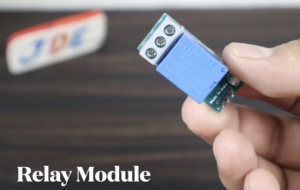
5V 1 Channel Relay Module
- We Connected To the relay module To Pin Number D4
The main component of the module is a relay, which is an electrically operated switch. The relay consists of an electromagnet and a set of contacts. When the electromagnet is energized, it mechanically activates the contacts, either connecting or disconnecting the circuit.
- The relay module also features relay contacts that can handle higher voltage and current. In the case of a 1-channel relay module, there is typically one set of contacts. These contacts are usually labelled as “NO” (normally open), “COM” (common), and “NC” (normally closed).
- When the relay is not activated, the NO and COM pins are disconnected, while the NC and COM pins are connected. When the relay is activated, the NO and COM pins are connected, while the NC and COM pins are disconnected.
16×2 LCD Display
- We Connected To the LCD Display with I2C protocol Through Only Four Wire Required
- VCC, GND, SDA And SCL.
A 16×2 LCD display with I2C interface refers to a liquid crystal display (LCD) module that has 16 columns and 2 rows of characters and uses the I2C (Inter-Integrated Circuit) communication protocol for interfacing with other devices.
The module is equipped with an integrated I2C interface, which is a widely used serial communication protocol. The I2C interface allows for easy communication between the LCD module and other devices, such as microcontrollers or Arduino boards, using only two wires: SDA (data line) and SCL (clock line).
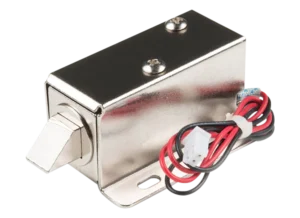
Solenoid lock
A solenoid lock is an electromechanical device used for securing doors or other access points. It consists of a solenoid, which is an electromagnetic coil, and a locking mechanism. When activated, the solenoid generates a magnetic field that moves the locking mechanism, either engaging or disengaging it to lock or unlock the door.
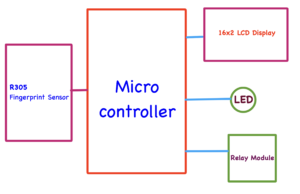
Block Diagram
Circuit Diagram
Circuit Diagram 1
Circuit Diagram 2
- Now We Connected To The Solenoid lock, We Connected To The Relay module Pin Number D4
- If You Flow The Circuit Diagram then You Upload the Code2 Source Code
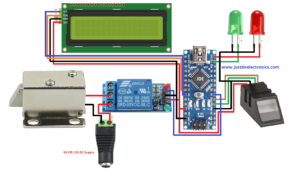
Circuit Diagram 3
In This Circuit Diagram, We connected to the 16×2 LCD Display With I2C Through.
They Connected to the Pin Number
- VCC – 5V
- GND – GND
- SDA – A4
- SCL – A5
And We Connected To the 2 LEDs red And green When We put the finger on the Fingerprint Sensor if the finger is valid then Green LED will Be On If is not Valid Then Red Led Will Be ON.
- Green Led – 11
- Red Led – 12
If you flow the circuit diagram 3 then just upload the code 3
Source Code
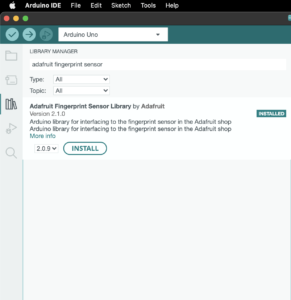
Library Adafruit Fingerprint Sensor
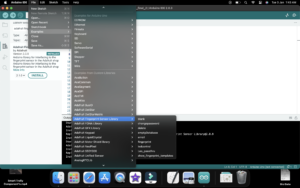
- Step 1 First we Download The Library
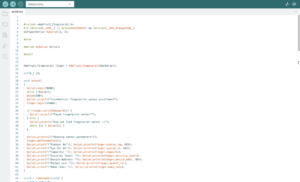
- Step 2 Just Go To the Example, Adafruit fingerprint Sensor Library and click Enroll Code
- Step 3 Just Check The Code And Connected To The Rx, Tx Pin To Arduino pin Numbers D2 And D3.
Code 1
|
1 2 3 4 5 6 7 8 9 10 11 12 13 14 15 16 17 18 19 20 21 22 23 24 25 26 27 28 29 30 31 32 33 34 35 36 37 38 39 40 41 42 43 44 45 46 47 48 49 50 51 52 53 54 55 56 57 58 59 60 61 62 63 64 65 66 67 68 69 70 71 72 73 74 75 76 77 78 79 80 81 82 83 84 85 86 87 88 89 90 91 92 93 94 95 96 97 98 99 100 101 102 103 104 105 106 107 108 109 110 111 112 113 114 115 116 117 118 119 120 121 122 123 124 125 126 127 128 129 130 131 132 133 134 135 136 137 138 139 140 141 142 143 144 145 146 147 148 149 150 151 152 153 154 155 156 157 158 159 160 161 162 163 164 165 166 167 168 169 170 171 172 173 174 175 176 177 178 179 180 181 182 183 184 185 186 187 188 189 190 191 192 193 194 195 196 197 198 199 200 201 202 203 204 205 |
#include <Adafruit_Fingerprint.h> #if (defined(__AVR__) || defined(ESP8266)) && !defined(__AVR_ATmega2560__) SoftwareSerial mySerial(2, 3); #else #define mySerial Serial1 #endif Adafruit_Fingerprint finger = Adafruit_Fingerprint(&mySerial); uint8_t id; void setup() { Serial.begin(9600); while (!Serial); delay(100); Serial.println("\n\nAdafruit Fingerprint sensor enrollment"); finger.begin(57600); if (finger.verifyPassword()) { Serial.println("Found fingerprint sensor!"); } else { Serial.println("Did not find fingerprint sensor :("); while (1) { delay(1); } } Serial.println(F("Reading sensor parameters")); finger.getParameters(); Serial.print(F("Status: 0x")); Serial.println(finger.status_reg, HEX); Serial.print(F("Sys ID: 0x")); Serial.println(finger.system_id, HEX); Serial.print(F("Capacity: ")); Serial.println(finger.capacity); Serial.print(F("Security level: ")); Serial.println(finger.security_level); Serial.print(F("Device address: ")); Serial.println(finger.device_addr, HEX); Serial.print(F("Packet len: ")); Serial.println(finger.packet_len); Serial.print(F("Baud rate: ")); Serial.println(finger.baud_rate); } uint8_t readnumber(void) { uint8_t num = 0; while (num == 0) { while (! Serial.available()); num = Serial.parseInt(); } return num; } void loop() { Serial.println("Ready to enroll a fingerprint!"); Serial.println("Please type in the ID # (from 1 to 127) you want to save this finger as..."); id = readnumber(); if (id == 0) { return; } Serial.print("Enrolling ID #"); Serial.println(id); while (! getFingerprintEnroll() ); } uint8_t getFingerprintEnroll() { int p = -1; Serial.print("Waiting for valid finger to enroll as #"); Serial.println(id); while (p != FINGERPRINT_OK) { p = finger.getImage(); switch (p) { case FINGERPRINT_OK: Serial.println("Image taken"); break; case FINGERPRINT_NOFINGER: Serial.println("."); break; case FINGERPRINT_PACKETRECIEVEERR: Serial.println("Communication error"); break; case FINGERPRINT_IMAGEFAIL: Serial.println("Imaging error"); break; default: Serial.println("Unknown error"); break; } } // OK success! p = finger.image2Tz(1); switch (p) { case FINGERPRINT_OK: Serial.println("Image converted"); break; case FINGERPRINT_IMAGEMESS: Serial.println("Image too messy"); return p; case FINGERPRINT_PACKETRECIEVEERR: Serial.println("Communication error"); return p; case FINGERPRINT_FEATUREFAIL: Serial.println("Could not find fingerprint features"); return p; case FINGERPRINT_INVALIDIMAGE: Serial.println("Could not find fingerprint features"); return p; default: Serial.println("Unknown error"); return p; } Serial.println("Remove finger"); delay(2000); p = 0; while (p != FINGERPRINT_NOFINGER) { p = finger.getImage(); } Serial.print("ID "); Serial.println(id); p = -1; Serial.println("Place same finger again"); while (p != FINGERPRINT_OK) { p = finger.getImage(); switch (p) { case FINGERPRINT_OK: Serial.println("Image taken"); break; case FINGERPRINT_NOFINGER: Serial.print("."); break; case FINGERPRINT_PACKETRECIEVEERR: Serial.println("Communication error"); break; case FINGERPRINT_IMAGEFAIL: Serial.println("Imaging error"); break; default: Serial.println("Unknown error"); break; } } // OK success! p = finger.image2Tz(2); switch (p) { case FINGERPRINT_OK: Serial.println("Image converted"); break; case FINGERPRINT_IMAGEMESS: Serial.println("Image too messy"); return p; case FINGERPRINT_PACKETRECIEVEERR: Serial.println("Communication error"); return p; case FINGERPRINT_FEATUREFAIL: Serial.println("Could not find fingerprint features"); return p; case FINGERPRINT_INVALIDIMAGE: Serial.println("Could not find fingerprint features"); return p; default: Serial.println("Unknown error"); return p; } // OK converted! Serial.print("Creating model for #"); Serial.println(id); p = finger.createModel(); if (p == FINGERPRINT_OK) { Serial.println("Prints matched!"); } else if (p == FINGERPRINT_PACKETRECIEVEERR) { Serial.println("Communication error"); return p; } else if (p == FINGERPRINT_ENROLLMISMATCH) { Serial.println("Fingerprints did not match"); return p; } else { Serial.println("Unknown error"); return p; } Serial.print("ID "); Serial.println(id); p = finger.storeModel(id); if (p == FINGERPRINT_OK) { Serial.println("Stored!"); } else if (p == FINGERPRINT_PACKETRECIEVEERR) { Serial.println("Communication error"); return p; } else if (p == FINGERPRINT_BADLOCATION) { Serial.println("Could not store in that location"); return p; } else if (p == FINGERPRINT_FLASHERR) { Serial.println("Error writing to flash"); return p; } else { Serial.println("Unknown error"); return p; } return true; } |
Code 2
|
1 2 3 4 5 6 7 8 9 10 11 12 13 14 15 16 17 18 19 20 21 22 23 24 25 26 27 28 29 30 31 32 33 34 35 36 37 38 39 40 41 42 43 44 45 46 47 48 49 50 51 52 53 54 55 56 |
#include <SoftwareSerial.h> #include <Adafruit_Fingerprint.h> int electronic_lock = 4; SoftwareSerial mySerial(2, 3) Adafruit_Fingerprint finger = Adafruit_Fingerprint(&mySerial); void setup() { pinMode(13, OUTPUT); Serial.begin(9600); while (!Serial) ; delay(100); finger.begin(57600); if (finger.verifyPassword()) { Serial.println("Found fingerprint sensor"); } else { Serial.println("Did not find fingerprint sensor"); while (1) { delay(1); } } finger.getTemplateCount(); Serial.print("Sensor contains "); Serial.print(finger.templateCount); Serial.println(" template(s)"); Serial.println("Waiting for valid finger..."); } void loop() { getFingerprintIDez(); delay(50); } int getFingerprintIDez() { uint8_t p = finger.getImage(); if (p != FINGERPRINT_OK) return -1; p = finger.image2Tz(); if (p != FINGERPRINT_OK) return -1; p = finger.fingerFastSearch(); if (p != FINGERPRINT_OK) return -1; // found a match! Serial.print("Found ID #"); Serial.print(finger.fingerID); Serial.print(" with confidence of "); Serial.println(finger.confidence); digitalWrite(electronic_lock, HIGH); delay(5000); digitalWrite(electronic_lock, LOW); Serial.println("Unlocked"); return finger.fingerID; } |
Code 3
|
1 2 3 4 5 6 7 8 9 10 11 12 13 14 15 16 17 18 19 20 21 22 23 24 25 26 27 28 29 30 31 32 33 34 35 36 37 38 39 40 41 42 43 44 45 46 47 48 49 50 51 52 53 54 55 56 57 58 59 60 61 62 63 64 65 66 67 68 69 70 71 72 73 74 75 76 77 78 79 80 81 82 83 84 85 86 87 88 89 90 91 92 93 94 95 96 97 98 99 100 101 102 103 104 105 106 107 108 109 110 111 112 113 114 115 |
#include <Adafruit_Fingerprint.h> #include <LiquidCrystal_I2C.h> #include <SPI.h> #include <SoftwareSerial.h> SoftwareSerial mySerial(2, 3); //Created instances LiquidCrystal_I2C lcd(0x27, 16, 2); Adafruit_Fingerprint finger = Adafruit_Fingerprint(&mySerial); int relayPin = 4; int red = 12; int yellow = 10; int green = 11; void setup() { pinMode(relayPin, OUTPUT); pinMode(red, OUTPUT); pinMode(yellow, OUTPUT); pinMode(green, OUTPUT); digitalWrite(relayPin, LOW); digitalWrite(red, LOW); digitalWrite(yellow, HIGH); digitalWrite(green, LOW); Serial.begin(9600); while (!Serial) ; delay(100); lcd.init(); lcd.backlight(); lcd.setCursor(0, 0); lcd.print("Fingerprint Door"); lcd.setCursor(0, 1); lcd.print("lock by prateek"); delay(3000); lcd.clear(); finger.begin(57600); if (finger.verifyPassword()) { lcd.setCursor(0, 0); lcd.print(" FingerPrint "); lcd.setCursor(0, 1); lcd.print("Sensor Connected"); } else { lcd.setCursor(0, 0); lcd.print("Unable to found"); lcd.setCursor(0, 1); lcd.print("Sensor"); delay(3000); lcd.clear(); lcd.setCursor(0, 0); lcd.print("Check Connections"); while (1) { delay(1); } } lcd.clear(); } void loop() { } int getFingerprintIDez() { uint8_t p = finger.getImage(); if (p != FINGERPRINT_OK) { lcd.setCursor(0, 0); lcd.print(" Waiting For"); lcd.setCursor(0, 1); lcd.print(" Valid Finger"); return -1; } p = finger.image2Tz(); if (p != FINGERPRINT_OK) { lcd.clear(); lcd.setCursor(0, 0); lcd.print(" Messy Image"); lcd.setCursor(0, 1); lcd.print(" Try Again"); delay(3000); lcd.clear(); return -1; } p = finger.fingerFastSearch(); if (p != FINGERPRINT_OK) { lcd.clear(); lcd.setCursor(0, 0); lcd.print("Not Valid Finger"); delay(3000); lcd.clear(); digitalWrite(red, HIGH); delay(3000); digitalWrite(red, LOW); return -1; } lcd.clear(); lcd.setCursor(0, 0); lcd.print(" Door Unlocked"); lcd.setCursor(0, 1); lcd.print(" Welcome"); digitalWrite(relayPin, HIGH); digitalWrite(green, HIGH); delay(3000); digitalWrite(relayPin, LOW); digitalWrite(green, LOW); lcd.clear(); return finger.fingerID; } |
Video Tutorial
Conclusion
Building a fingerprint door lock system with Arduino provides an exciting opportunity to enhance security and convenience in your home or office. By integrating an Arduino board, fingerprint sensor module, and lock mechanism, you can create a reliable biometric security system. Following the outlined steps, you’ll be on your way to implementing your own personalized fingerprint door lock system.






Nice work 👍